|
|
|
Who's Online
There currently are 6040 guests and
3 members online. |
|
Categories
|
|
Information
|
|
Featured Product
|
|
|
 |
|
|
There are currently no product reviews.
 ;
Thank you for providing this manual and at low cost.
The Philips scope is of excellent quality, longevity and build and had a couple of faults
when it was passed to me. Having the CCT diagrams is a blessing.
I have fixed the problems and also modded the scope to my requirements.
I have built a 24v Li-Ion pack for portable use from old but good laptop batts.
it is working beautifully and I am well pleased. Keep up the good work Guys.
 ;
manual was very helpful in learning how to propery use my washer. I could not find this manual anywhere else.
;
Awesome quality manual. You really saved my bacon with this one. Was looking for some specific information with regards to my "new" vintage VCR that didn't come with the owners manual. This site is truely a goldmine of available manuals. The quality of the scans are top notch.
Thank-you so much for this awesome manual. If you're looking for this Sony SL-HF400 owners manual, this is the one you NEED to buy. Definitely worth the money.
;
The manual was made available promptly. I is a clean scan of the original. I had no problem downloading it. The scan was well centered and cleanly formatted. It is as good a product as can be had without being the original document.
;
Received downlink in less then 8 hours, Item was in good copy condition, and told me how to program the clock timer. The price was very resonable, and the process was very automated and was GREAT to work with.
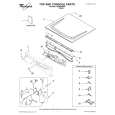
Complete Installation
1. Check that all parts are now installed. If there is an extra part, go back through the steps to see which step was skipped. 2. Check that you have all of your tools. 3. Dispose of/recycle all packaging materials. 4. Check the dryer�s final location. Be sure the vent is not crushed or kinked. 5. Check that the dryer is level. See �Level Dryer.� 6. For power supply cord installation, plug into an outlet. For direct wire installation, reconnect power. 7. Remove the blue protective film on the console and any tape remaining on the dryer. 8. Read �Dryer Use� in the Dryer User Instructions. 9. Wipe the dryer drum interior thoroughly with a damp cloth to remove any dust. 10. Select a Timed Dry heated cycle, and start the dryer. Do not select the Air Only modifier. If the dryer will not start, check the following:
s s s s s
Controls are set in a running or �On� position. Start button has been pushed firmly. Dryer is plugged into an outlet and/or electrical supply is connected. Household fuse is intact and tight, or circuit breaker has not tripped. Dryer door is closed.
11. When the dryer has been running for 5 minutes, open the dryer door and feel for heat. If you feel heat, cancel cycle and close the door. If you do not feel heat, turn off the dryer and check the following:
s
There may be 2 household fuses or circuit breakers for the dryer. Check that both fuses are intact and tight, or that both circuit breakers have not tripped. If there is still no heat, contact a qualified technician.
NOTE: You may notice a burning odor when the dryer is first heated. This odor is common when the heating element is first used. The odor will go away.
18
|
|
|
> |
|