|
|
|
Who's Online
There currently are 6043 guests online. |
|
Categories
|
|
Information
|
|
Featured Product
|
|
|
 |
|
|
There are currently no product reviews.
 ;
Thank´s for your help, I already recived these manual from you
;
Thank you for your manual It has the basic things to and i use the Oszi for Longer Time.
THX
;
Actually, I was looking for this information for 3 years!...now thanks to you, the manual is on my hands and of great help, cause I understand now where I was doing wrong connections and wires...excellent, I'll be back to you if in need, thank you.
 ;
This manual covers the main equipment features only. While it also includes the procedure for saving and loading from the now long obsolete memory cards it does not mention the how to operate with the optional floppy drive interface so I am still at a loss about how to use this! Note that there is a separate manual covering the MIDI interface and programming via the keyboard, not included in this download. You will also need to get hold of this if you want to use the MIDI interface properly. Basically there is little difference between this manual and the free to download manual for the similar PR60 model.
;
Good list of manuals. I found a very rare one and easily get. Should be promptly to download, as we must to wait hours even after confirmed payment.
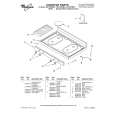
Burner ports: Check burner flames occasionally for proper size and shape as shown above. A good flame is blue in color, not yellow. Keep this area free of soil and do not allow spills, food, cleaning agents or any other material to enter the burner ports.
Burner Rotation
The right side burners can be rotated 180° to reduce the distance between the front and back burners. This permits better heat distribution when using oblong pans or griddles.
To Clean:
IMPORTANT: Before cleaning, make sure all controls are off and the oven and cooktop are cool. Do not use oven cleaners, bleach or rust removers. 1. Remove the burner cap from the burner base and clean according to �General Cleaning� section. 2. Clean the gas tube opening with a damp cloth. 3. Clean clogged burner ports with a straight pin as shown. Do not enlarge or distort the port. Do not use a wooden toothpick. If the burner needs to be adjusted, contact a trained repair specialist.
To Rotate Burners:
1. Make sure burners are cool before beginning rotation. 2. Remove right side grates and burner caps. 3. Lift burners from cooktop, as shown.
4. Rotate burners 180°, as shown.
4. Replace the correct size burner cap onto the correct size burner base, making sure the alignment pins are properly aligned with the burner cap. On some models, each size burner cap and burner base has a corresponding letter �A,� �B,� �C� and �D.� To ensure a proper fit and that the burner will light, make sure that the burner cap matches with its corresponding letter on the burner base.
1
5. Replace burners, with large hole over gas tube opening, and small hole over the igniter. See �Sealed Surface Burners� section for burner parts descriptions. Push burner down, flush with cooktop. 6. Replace burner caps and grates.
Home Canning
2
1. Incorrect 2. Correct
s
When canning for long periods, alternate the use of surface cooking areas, elements or surface burners between batches. This allows time for the most recently used areas to cool.
s
Center the canner on the grate or largest surface cooking area or element. Canners should not extend more than 1 in. (2.5 cm) outside the cooking area. Do not place canner on 2 surface cooking areas, elements or surface burners at the same time. On ceramic glass models, only use flat-bottomed canners. On coil element models, the installation of a Canning Unit Kit is recommended. If a kit is not installed, the life of the coil element will be shortened. See �Assistance or Service� for ordering instructions. For more information, contact your local government source of help on food preparation. Companies that manufacture home canning products can also offer assistance.
5. Turn on the burner. If the burner does not light, check cap alignment. If the burner still does not light, do not service the sealed burner yourself. Contact a trained repair specialist.
s s
s
7
|
|
|
> |
|