|
|
|
Who's Online
There currently are 5522 guests online. |
|
Categories
|
|
Information
|
|
Featured Product
|
|
|
 |
|
|
There are currently no product reviews.
 ;
The manual was exactly what I wanted and I found it nowhere else. Thanks!
;
Having purchased a 1994 Kenwood music system from a Charity shop in 2013 (it was a high end product in its day), I found myself not quite knowing where to plug in what, and how to do this, that and the next thing. I needed a Manual, and after failure with another online 'Manual provider' I found Owner Manuals dot com. Well, I wasn't sure, but it was only $5, and if things didn't work out, I wouldn't have lost much...
But things DID work out. After paying my childrens inheritance money, $4.99, I was sent a Manual for my Kenwood System very quickly. Alas, it was in German, and being Scottish, I could not read it or get my system in order from it...a rapid email to them brought the English Manual in short order, and my retro-system was and IS up and running in it's regulation settings.
I am very grateful to http://www.owner-manuals.com for their quick service and for even having such an obsolete Manual in the first place! If you need a Manual for ANYTHING, try here first. I wouldn't be surprised if I bought a 1928 Marconi radio, and got the user Manual for THAT here too!
Top marks.
John Copeland
Glasgow
Scotland
;
I was so happy that the owner's manual was available. It is well written and helped me to use the radio/CD player/recorder without problems. Thanks for making it available.
Irene Lambert
;
Excellant!!! Very quick and easy....Best $4.99 I have spent in a very long time..
I highly recommend this.
;
Thanks so much for the Owner's manual for my Sony PS - FL1. I had purchased the turntable off of eBay. It came in and looked great. Packed well and appeared to be great. I balanced and aligned the tone are and hooked it up. When trying to play a record the tone are would move to the right place and just before it would drop to play it moved back off the edge of the record before touching down. I searched the net for an answer to this issue. No luck. Then I purchased the owners manual and sure enough there was a place to adjust where the stylus touched down. That adjustment solved the problem and saved me a $35 feet to have the player checked out. The manual is well written and easy to understand. It is a must have for anyone with this front loading Sony turntable.
OVEN USE
Odors and smoke are normal when the oven is used the first few times, or when it is heavily soiled. IMPORTANT: The health of some birds is extremely sensitive to the fumes given off. Exposure to the fumes may result in death to certain birds. Always move birds to another closed and well ventilated room.
Timer
The Timer can be set in minutes and seconds or hours and minutes up to 11 hours, 59 minutes, and counts down the set time. The Timer does not start or stop the oven
Electronic Clock/Timer
(on some models)
1 2 3
To Set:
1. Touch TIMER. The colon will flash during Timer programming. 2. Touch the �up� or �down� arrow pads to set length of time. 3. Touch TIMER. The Timer will begin counting down 5 seconds after the time is set. To display the time of day while the Timer is counting down, touch CLOCK. Time of day will be displayed 5 seconds before returning to the Timer countdown. When there is one minute of time remaining, the display will begin counting down in seconds. When the Timer reaches zero, the display will show �End� and four 1-second tones will sound. To Cancel: Touch TIMER twice in the Timer mode.
5
1. Clock
4
3. Increase 4. Decrease 5. Timer
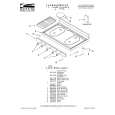
Aluminum Foil
IMPORTANT: Do not line the oven bottom with any type of foil, liners or cookware because permanent damage will occur to the oven bottom finish. s On those models with bottom vents, do not block or cover the oven bottom vents.
s
2. Display
Display
When power is first supplied to the range, �12:00� will appear on the display. If �12:00� appears at any other time, a power failure has occurred. Reset the Clock. See �Clock� section. Any time the Timer is not in use, the display will show the time of day.
Do not cover entire rack with foil because air must be able to move freely for best cooking results. To catch spills, place foil on rack below dish. Make sure foil is at least 1 in. (2.5 cm) larger than the dish and that it is turned up at the edges.
s
Clock
This is a 12-hour clock and does not show a.m. or p.m.
IMPORTANT: Never place food or bakeware directly on the oven door or bottom. Permanent damage will occur to the porcelain finish.
Positioning Racks and Bakeware
To Set:
Before setting, make sure the Timer is off. 1. Touch CLOCK. The colon will flash during Clock programming. 2. Touch the �up� or �down� arrow pads to set the time of day. The time can be changed in either small or 10-minute increments by touching a pad briefly or by touching and holding a pad. 3. Touch CLOCK. The colon will stop flashing when the Clock is active.
RACKS
Position racks before turning the oven on. Do not move racks with bakeware on them. Make sure racks are level. For best performance, cook on one rack. Place the rack so the top of food will be centered in the oven. To move a rack, pull it out to the stop position, raise the front edge, then lift out.
FOOD Frozen pies, large roasts, turkeys, angel food cakes Bundt cakes, most quick breads, yeast breads, casseroles, meats Cookies, biscuits, muffins, cakes, nonfrozen pies RACK POSITION 1 or 2
2
2 or 3
8
|
|
|
> |
|