|
|
|
Who's Online
There currently are 5949 guests and
1 member online. |
|
Categories
|
|
Information
|
|
Featured Product
|
|
|
 |
|
|
There are currently no product reviews.
 ;
Very satisfied! I was searching for several days, but nope; till I discovered your webside and there it was at a very reasonable price. Keep up the good work!
Paul
Flanders
 ;
Generally speaking good copy; a few pages too hard contrast...
Good service and communication.
;
I purchased the unit from a private party and the original owners manual was not available. Having the ability to download it was extremely helpful and clarified operating the equipment immensely. This is a complicated unit and without the manual I would not have been able to maximize it's potential. Thank you.
;
Being a user of older radios of many kinds, preferring them over more modern rigs, this manual was invaluable in the programming of my two. I now know for certain what the assorted buttons functions are, and am very grateful to have found this excellent site. Many thanks for your assistance, Tony.
;
Clear and easy to read. All details as expected. Price acceptable , and quick delivery.
DRYER CARE
Cleaning the Dryer Location
Keep dryer area clear and free from items that would obstruct the flow of combustion and ventilation air.
As Needed Cleaning
1. Roll lint off the screen with your fingers. 2. Wet both sides of lint screen with hot water. 3. Wet a nylon brush with hot water and liquid detergent. Scrub lint screen with the brush to remove residue buildup. 4. Rinse screen with hot water. 5. Thoroughly dry lint screen with a clean towel. Replace screen in dryer.
WARNING
Cleaning the Dryer Interior
Explosion Hazard Keep flammable materials and vapors, such as gasoline, away from dryer. Place dryer at least 18 inches (46 cm) above the floor for a garage installation. Failure to do so can result in death, explosion, or fire.
1. Apply a nonflammable household cleaner to the stained area of the drum and rub with a soft cloth until stain is removed. 2. Wipe drum thoroughly with a damp cloth. 3. Tumble a load of clean cloths or towels to dry the drum. NOTE: Garments which contain unstable dyes, such as denim blue jeans or brightly colored cotton items, may discolor the dryer interior. These stains are not harmful to your dryer and will not stain future loads of clothes. Dry unstable dye items inside-out to prevent dye transfer.
Cleaning the Lint Screen
Clean the lint screen before each load. A screen blocked by lint can increase drying time. IMPORTANT:
s
Removing Accumulated Lint
From Inside the Dryer Cabinet
Lint should be removed every 2 years, or more often, depending on dryer usage. Cleaning should be done by a qualified person.
Do not run the dryer with the lint screen loose, damaged, blocked, or missing. Doing so can cause overheating and damage to both the dryer and fabrics. If lint falls off the screen into the dryer during removal, check the exhaust hood and remove the lint.
From Inside the Exhaust Vent
Lint should be removed every 2 years, or more often, depending on dryer usage.
s
Every Load Cleaning
Style 1: 1. The lint screen is located on top of the dryer. Pull the lint screen toward you. Roll lint off the screen with your fingers. Do not rinse or wash screen to remove lint. Wet lint is hard to remove. 2. Push the lint screen firmly back into place. Style 2: 1. The lint screen is located in the door of the dryer. Pull the lint screen straight up. Roll lint off the screen with your fingers. Do not rinse or wash screen to remove lint. Wet lint is hard to remove. 2. Push the lint screen firmly back into place.
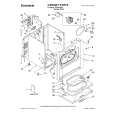
Changing the Drum Light
1. Unplug dryer or disconnect power. 2. Open the dryer door. Locate the light bulb cover on the back wall of the dryer. Remove the screw located in the lower righthand corner of the cover. Remove the cover. 3. Turn bulb counterclockwise. Replace the bulb with a 10-watt appliance bulb only. Replace the cover and secure with the screw. 4. Plug in dryer or reconnect power.
5
|
|
|
> |
|