|
|
|
Who's Online
There currently are 6004 guests online. |
|
Categories
|
|
Information
|
|
Featured Product
|
|
|
 |
|
|
There are currently no product reviews.
 ;
very helpful, the information in these manuels are very detailed
;
Please tell us what you think and share your opinions with others. Be sure to focus your comments on the product. You will receive $2.00 of store credit for Your review.
;
Please tell us what you think and share your opinions with others. Be sure to focus your comments on the product. You will receive $2.00 of store credit for Your review.
;
Good copy and great customer service! There was some confusion with my order and it was resolved promptly!
;
Having bought a pre-owned Sony FM stereo tuner through eBay, it came without any manuals. It soon became clear that to get the best from this excellent tuner I needed a decent manual because much of the operation was not intuitive to a newboy to hi fi like me. I managed to download the official Sony multi-lingual manual from Owner-Manuals.com with no problem at all - a really quick and easy service. I'm very glad I did because I found out all the operations of the tuner and was then able to not only set it up quickly but also to get much more from it that poke-and-hope trialling would ever achieve. In my book $4.99 very well spent.
s
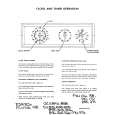
FREEZER FEATURES
Your model may have some or all of these features. Features that can be purchased separately as product accessories are labeled with the word �Accessory.� Not all accessories will fit all models. If you are interested in purchasing one of the accessories, please call the toll-free number on the cover or in the "Assistance or Service" section.
s s s
Avoid connecting the ice maker to a softened water supply. Water softener chemicals (such as salt) can damage parts of the ice maker and lead to poor quality ice. If a softened water supply cannot be avoided, make sure the water softener is operating properly and is well maintained. It is normal for the ice cubes to be attached at the corners. They will break apart easily. Do not force the wire shut-off arm up or down. Do not store anything on top of the ice maker or in the ice storage bin.
(on some models - Accessory)
There are two styles of ice makers: s Normal (Style 1 - on left)
s
Ice Maker
Freezer Shelf
(on some models)
To remove the shelf: 1. Lift entire shelf slightly. 2. Move shelf all the way to one side. 3. Tilt other side up and out of shelf supports. 4. Pull shelf up and out
Maximum Ice (Style 2 - on right)
MAX
NORMAL
To turn the ice maker on: The on/off switch for the ice maker is a wire shut-off arm located on the side of the ice maker. To turn the ice maker on, simply lower the wire shut-off arm. NOTE: The ice maker will not make ice until the freezer is cold enough. Allow 24 hours to produce the first batch of ice. Discard the first three batches of ice produced. To turn the ice maker off: s Automatic turn off: As ice is made, the ice cubes will fill the ice storage bin, and the ice cubes will raise the wire shut-off arm to the OFF (arm up) position.
s
To replace the shelf: 1. Tilt the shelf and insert into freezer compartment. 2. Insert one end of the shelf all the way into the center of the shelf supports. 3. Lower other end of shelf and insert into the shelf supports. 4. Lower shelf into place.
Manual turn off: Lift the wire shut-off arm to the OFF (arm up) position and listen for the click to make sure the ice maker will not continue to operate.
NOTE: The shelf should lower slightly and lock into place. If the shelf does not appear stable, make sure both ends of the shelf are inserted into the shelf supports.
To increase ice production rate: Maximum Ice Production (on some models): In maximum ice s production, the ice maker should produce approximately 16 to 20 batches of ice in a 24-hour period. If your refrigerator has the maximum ice production feature, push the switch to MAX.
s
Frozen food storage guide
Storage times will vary according to the quality and type of food, the type of packaging or wrap used (should be airtight and moisture-proof), and the storage temperature. Seal the package or container securely to prevent taste and odor transfer throughout the product. Ice crystals inside a sealed package are normal. This simply means that moisture in the food and air inside the package have condensed, creating ice crystals. Put no more unfrozen food into the freezer than will freeze within 24 hours (no more than 2-3 lb of food per cubic foot [907-1,350 g per L] of freezer space). Leave enough space in the freezer for air to circulate around packages. Be careful to leave enough room for the door to close tightly. NOTE: For more information on preparing food for freezing, check a freezer guide or reliable cookbook.
Normal Ice Production: In normal ice production mode, the ice maker should produce approximately 8 to 12 batches of ice in a 24-hour period. If ice is not being made fast enough, turn the Freezer Control toward a higher (colder) number in half number steps. (For example, if the control is at 3, move it to between 3 and 4.) Wait 24 hours and, if necessary, gradually turn the Freezer Control to the highest setting, waiting 24 hours between each increase. Allow 24 hours to produce the first batch of ice. Discard the first three batches of ice produced to avoid impurities that may be flushed out of the system. The quality of your ice will be only as good as the quality of the water supplied to your ice maker.
REMEMBER:
s s
s
14
|
|
|
> |
|