Very satisfied! I was searching for several days, but nope; till I discovered your webside and there it was at a very reasonable price. Keep up the good work!
Paul
Flanders
I purchased the unit from a private party and the original owners manual was not available. Having the ability to download it was extremely helpful and clarified operating the equipment immensely. This is a complicated unit and without the manual I would not have been able to maximize it's potential. Thank you.
Being a user of older radios of many kinds, preferring them over more modern rigs, this manual was invaluable in the programming of my two. I now know for certain what the assorted buttons functions are, and am very grateful to have found this excellent site. Many thanks for your assistance, Tony.
Clear and easy to read. All details as expected. Price acceptable , and quick delivery.
Text excerpt from page 29 (click to view)
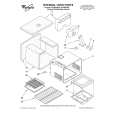
3. Press the Self-Clean button, followed by the Stop Time button. Immediately turn the Set Knob to the new stop time.
The Self-Cleaning cycle will start at a time equal to the stop time minus the cleaning time. In the example at the right, that would be 530 minus three hours, or 2:30.
YOU SEE
I!!!!
l
(example for 530 stop time)
TURN
After the Self-Cleaning starts:
cycle
YOU SEE
The LOCK Indicator Light will come on when the oven temperature goes above normal baking/roasting temperatures. The Lock Lever must not be moved and the door cannot be opened when this Indicator Light is on.
(example when cleaning Immediately)
After the Self-Cleaning is completed:
cycle
YOU SEE
(time of day)
When the oven bakindroasting
reaches normal temperatures:
The LOCK Indicator Light will go off. Move the Lock Lever back to the left. DO NOT FORCE IT. Wait until it moves easily.