|
|
|
Who's Online
There currently are 5441 guests online. |
|
Categories
|
|
Information
|
|
Featured Product
|
|
|
 |
|
|
There are currently no product reviews.
 ;
I AM HIGHLY IMPRESSED BY THE EASE OF USE OF THIS DOWNLOAD SERVICE. INSTRUCTIONS ARE CLEAR AND SIMPLE TO FOLLOW....EVEN BY TECHNOPHOBES SUCH AS MYSELF. THE EMAILS POINT YOU IN THE RIGHT DIRECTION...ITS SO EASY PEASY. THE DOWNLOAD CHOICE OF USER MANUALS IS EXTENSIVE AND I COULD NOT FIND A CHEAPER OR MORE EFFICIENT SERVICE ON THE INTERNET. I COULD NOT HAVE MADE A BETTER CHOICE OF INFORMATION PROVIDER. SHOULD I EVER NEED ANOTHER USER MANUAL, THEN THIS IS THE FIRST CHOICE SITE. COULD NOT BE BETTER PLEASED!!!!!!!...MANY THANXES FROM JIM BURNS
;
I was impressed with the quality of service (frequent e-mails to let you know the status of your order), and the speed at which the download became available. The manual was a life saver and was not easy to track down. Thank you for such an excellent service.
;
the manual was just what i wanted it had all the revelent information required to operate the hifi .Iwould use any manual i downloaded for any item which needs a manual
;
Die gewünschte Bedienungsanleitung wurde vereinbarungsgemäß in deutsch bereitgestellt. Sie ist gut lesbar. Kein Kauderwelsch.
Danke für den Service.
;
GOOD SERVICE MANUAL GOT ALL THE INFO. THAT I NEEDED..
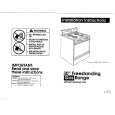
Surface
burners
Scrwfs
1. Lit up the cooktop, following the instructions on page 33. 2. Before cleaning, remove screws that hold each of the burners in place. The screws prevent the burners from moving during shipment. Remove the shipping screws with a Phillips screwdriver and lift the burners up and out. This separates the burners from the mounting bracket under each burner pair. 3. Wipe off surface burners with warm, soapy water and a sponge after each use. To remove cooked-on food, soak the burners in a vinegar and water solution for 20-30 minutes. Scrub with a plastic scrubbing pad. 4. If ports are clogged, clean with a straight pin. DO NOT enlarge or distort the ports. DO NOT use a toothpick to clean the ports. 5. Before putting the burners back, dry them thoroughly by setting them in a warm oven for 30 minutes. 6. Replace burners, making sure they are properly seated and level. Replace screws. 7. Occasionally check the burner flames for proper size and shape as shown. A good flame is blue in color. If flames lift off ports, are yellow, or are noisy when turned off, you may need to clean the burners (see above), or call a qualified technician for adjustment.
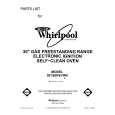
I *. 000 00 000
�/- 1 �-
BY Typical surface burner name at highsst sslttng
Cleaning
PART Control knobs
chart
WHAT TO USE Sponge and warm, soapy water
l
Use the following table to help you clean your range. HOW TO CLEAN Turn knobs to OFF and pull straight away from control panel. l Wash, rinse and dry thoroughly. Do not soak. l Replace knobs. Make sure all knobs point to OFF. DO NOT USE steel wool or abrasive cleaners. They may damage the finish of the knobs.
l
Control panels
Sponge and warm, soapy water OR Paper towel and spray glass cleaner
Wash, rinse and dry thoroughly. DO NOT USE steel wool or abrasive cleaners. They may damage the finish. DO NOT SPRAY cleaner directly on panel. Apply cleaner to paper towel. NOTE: Make sure you have not turned the oven on when cleaning panel. If you have, push the Off/Cancel pad.
34
|
|
|
> |
|