|
|
|
Who's Online
There currently are 6042 guests and
1 member online. |
|
Categories
|
|
Information
|
|
Featured Product
|
|
|
 |
|
|
There are currently no product reviews.
 ;
I did not have the manual for a Whirl Pool gas dryer, therefore I purchased it from Owner-manuals. This is exactly what I needed. Thank you for the service.
 ;
I was so pleased to get the owner`s manuel within one hour! Thanks again.
Regards
Werner
;
Finding the owners manual for my Pioneer CRWM62R is greatly appreciated. I had searched several other web sites with no success. Although my manual was not listed on your site for immediate download, I recevied an email within a few hours that my ower's manual was posted for me. I had no difficulty downloading the manual for my 20 year old multi-cassette player. Owner Manuals provides a service that is valuable, easy-to-use, accurate , efficient, and priced fairly. I thank you.
;
Excellent manual - just what I needed. Although currently available only in German, their are lots of pictures which makes it all very clear.
;
PHILIPS PE1642 Owner's Manual
Hi,
you have complet fullfilled my expectance.
Price is OK.
Robert Schmid
Adjusting
the oven temperature
control
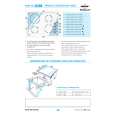
Although your new oven is properly adjusted to provide accurate temperatures, it may cook faster or slower than your old oven. If, after using the oven for a period of time, you are not satisfied with the baking/roasting results, you can change the temperature calibration by following these steps: 1. Make sure the Oven Temperature Control Knob is turned to the off position. Pull knob straight off and flip it over.
2. Loosen the locking screws inside the control knob. Note the position of the notches. 3. To lower the temperature, hold knob handle firmly and turn skirt clockwise to move the tooth a notch to the left. Each notch equals about 10°F (5°C). 4. To raise the temperature, hold knob handle firmly and turn skirt counterclockwise to move the tooth a notch to the right. Each notch equals about 10°F (5°C). 5. Tighten the locking screws and replace the control knob.
Locking screws
h
Notches /
Sk�irt
Broiling
1. Position the rack properly before turning on the oven. Position the oven rack so that the surface of the food is at least 3 inches (7 cm) away from the broil burner. See �Broiling rack position chart� on page 17. 2. Put the broiler pan and food on the rack. 3. Completely close the oven door to ensure proper broiling temperatures.
15
|
|
|
> |
|