|
|
|
Who's Online
There currently are 6043 guests online. |
|
Categories
|
|
Information
|
|
Featured Product
|
|
|
 |
|
|
There are currently no product reviews.
 ;
The product manual I received was exactly what I was looking for, delivered painlessly at a very fair price. I can't ask for any more than that.
;
Very well done!!!!! congratulations. It was a bit longer than usual the wiating time even if it was on time (in 24 hours).
;
Last week I bought a second hand BAUKNECHT TRK4850 DRYER. It is a professional machine with many programs and switch options. I feared it would be a huge quest to find a manual. I was delighted when I found owner-manuals.com. After payment I received the file to download the next day already. The quality is great. I am very happy. Thanks!
but kindly the distributions of the operating programs not find in the owners manual,can you help me to understand the operating programs instructions thank you
;
Very good copy, very readable and easy transaction as always.
;
It is perfect, exactly what we needed. It's like the paper version but less clutter.
Using
the automatic
MEALTIMER��
clock
The automatic MEALTIMER clock is designed to turn the oven on and off at times you set, even when you are not around. Delayed time baking/roasting is ideal for foods which do not require a preheated oven, such as meats and casseroles. Do not use delayed time cooking for cakes, cookies, etc. -they will not rise properly. Before using the MEALTIMER clock, make sure the clock is set to the correct time of day. (See �Setting the clock� on page 11.)
To delay start automatically:
and stop
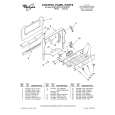
1. Position the oven rack(s) properly and place the food in the oven. 2. Push in and turn the Start Time Knob clockwise to the time you want baking/ roasting to start. 3. Push in and turn the Stop Time Knob clockwise to the time you want the oven to shut off. NOTE: There must be at least a half-hour difference between the start and stop times. 4. Set the Oven Selector to TIME BAKE. 5. Push in and turn the Oven Temperature Control counterclockwise to the baking/ roasting temperature you want. The oven will now start and stop automatically. The Oven Indicator Light will come on when the start time is reached. 6. After baking/roasting is done or to cancel the setting at any time, turn both the Oven Selector and Oven Temperature Control clockwise to OFF.
16
|
|
|
> |
|