|
|
|
Who's Online
There currently are 5854 guests online. |
|
Categories
|
|
Information
|
|
Featured Product
|
|
|
 |
|
|
There are currently no product reviews.
 ;
This manual covers the main equipment features only. While it also includes the procedure for saving and loading from the now long obsolete memory cards it does not mention the how to operate with the optional floppy drive interface so I am still at a loss about how to use this! Note that there is a separate manual covering the MIDI interface and programming via the keyboard, not included in this download. You will also need to get hold of this if you want to use the MIDI interface properly. Basically there is little difference between this manual and the free to download manual for the similar PR60 model.
;
Good list of manuals. I found a very rare one and easily get. Should be promptly to download, as we must to wait hours even after confirmed payment.
;
The manual was properly scanned and perfectly readable. The only small problem is that I couldn't use my dear Ctrl + F to find a word I needed.
;
Nothing wrong with the manual or the delivery - came to me the same day I ordered it. But afterwards I realized that I ordered the wrong manual. Probably better with the Quick start - version. So maybe it would be better if we could see a list with inhold for each manual before ordering?
 ;
Bought T4850 High End Tuner a few years ago, but i didn't know where all the buttons were used for. So i purchased the owners manual. Perfect! Just what i needed.
-.
-
Surface
tions above.
burners
the instruc-
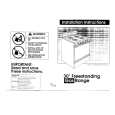
1. Lift up the cooktop, following
2. Before cleaning, remove screws that hold each of the burners in place. The screws prevent the burners from moving during shipment. Remove the shipping screws with a Phillips screwdriver, lift the burner up, tilt it to one side at the end closest to the ignitor and move it toward the back of the range. This separates the burner from the gas valve at the front of the range, so it can be easily removed. 3. Wipe off surface burners with warm, soapy water and a sponge after each use. To remove cooked-on food, soak the burners in a vinegar and water solution for 20-30 minutes. Scrub with a plastic scrubbing pad. 4. If ports are clogged, clean with a straight pin. DO NOT enlarge or distort the ports. DO NOT use a toothpick to clean the ports. 5. Before putting the burners back, dry them thoroughly by setting them in a warm oven for 30 minutes. 6. Replace burners, making sure they are properly seated and level. Replace screws. 7. Occasionally check the burner flames for proper size and shape as shown. A good flame is blue in color. If flames lift off ports, are yellow, or are noisy when turned off, you may need to clean the burners (see above), or call a qualified technician for adjustment.
Typical surface burner flame at the highest setting
19
|
|
|
> |
|