Although printing quality is not the best, the manual was very helpful in order to reactivate this ancient but still good electronic musical instrument.
as a first-time user and buyer from this site, i found the overall service outstanding!! this product is a godsend as, without it, i would never have been able to find my way around and use my machine as intended. i will certainly use this site again as required. many many thanx!!
This manual is exactly what I needed. This site always has every manual I need, and it is also much less expensive then most other sites. This is the only manual site I will use.
Useful manual, good scan, worth the pay if you find the unit difficult to operate.
Text excerpt from page 51 (click to view)
CARING FOR YOUR RANGE
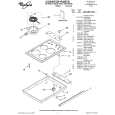
The oven lights
The oven lights will come on when you open the oven door. To turn the lights on when the oven door is closed, press the Oven Light pad on the control panel.
LIGHT
NOTE: Make sure oven is cool before replacing a light bulb.
To replace an oven light:
1. Disconnect power and make sure the oven is cool before replacing the light bulb.
4. Replace the light bulb cover by turning it clockwise. The light bulb cover must be in place when using the oven. The cover protects the bulb from breaking and from high oven temperatures. 5. Reconnect power. NOTE: The oven lights will not work during the Self-Cleaning cycle.
2. Remove the glass bulb cover in the back of the oven by turning it counterclockwise. 3. Remove the light bulb from its socket. Replace the bulb with a similar 125-volt, 15-watt appliance bulb.