|
|
|
Who's Online
There currently are 5883 guests online. |
|
Categories
|
|
Information
|
|
Featured Product
|
|
|
 |
|
|
There are currently no product reviews.
 ;
A comprehensive Operating and Service Manual. All schematics are complete and easy to read. The PCB drawings and complete parts list are very helpful. I would definitely recommend this manual.
;
SCANNING OF HIGH QUALITY
VERY, VERY HIGH VELOCITY DOWNLOAD
VERY GOOD PRICE,
TRUE SATISFIED, THANKS
;
Genuine Toshiba owner's manual. Couldn't really ask for more. And written in understandable English in contrast to a few recent experiences I have had with manuals for other equipment other than Toshiba but made in China and written in "Chinglish"!
;
I purchased a vintage Sony mixer off eBay and within the hour was able to locate and purchase the manual for it.I mean really,where else can you find a manual for a product made in 1983!? It was easy to find and purchase/download the manual I needed.I will use this site again for other equipment I have! Great site!
;
manual de usuario perfecto y completo de buena calidad de impresion y muy detallado ideal !
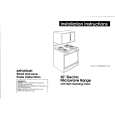
Adjusting
the oven temperature
control
Does your oven seem hotter or colder than your old oven? The temperature of your old oven may have shifted gradually without you noticing the change. Your new oven is properly adjusted to provide accurate temperatures. But, when compared to your old oven, the new design may give you different results. If, after using the oven for a period of time, you are not satisfied with the temperature settings, they can be adjusted by following these steps: 1. Turn the Oven Temperature Control Knob to the off position. Pull knob straight off and flip it over.
2. Loosen the locking screws inside the control knob. Note the position of the notches. 3. To lower the temperature, hold knob handle firmly and move the tooth a notch clockwise. Each notch equals about 10°F (5°C). 4. To raise the temperature, hold knob handle firmly and move the tooth a notch counterclockwise. Each notch equals about 10°F
(5°C).
Locking screws
Tighten the locking control knob.
screws
and replace the
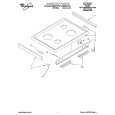
Broiling
1. Position the rack properly before turning on the oven. The oven rack should be positioned so that the surface of the food is at least 3 inches (7.4 cm) away from the broil burner. See �Broiling rack position chart� on page 14. 2. Put the broiler pan and food on the rack. 3. Close the door to the Broil Stop position (open about 4 inches [lo.2 cm]). The door will stay open by itself.
13
|
|
|
> |
|