Actually, I was looking for this information for 3 years!...now thanks to you, the manual is on my hands and of great help, cause I understand now where I was doing wrong connections and wires...excellent, I'll be back to you if in need, thank you.
This manual covers the main equipment features only. While it also includes the procedure for saving and loading from the now long obsolete memory cards it does not mention the how to operate with the optional floppy drive interface so I am still at a loss about how to use this! Note that there is a separate manual covering the MIDI interface and programming via the keyboard, not included in this download. You will also need to get hold of this if you want to use the MIDI interface properly. Basically there is little difference between this manual and the free to download manual for the similar PR60 model.
Good list of manuals. I found a very rare one and easily get. Should be promptly to download, as we must to wait hours even after confirmed payment.
Text excerpt from page 8 (click to view)
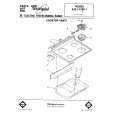
Removing and Replacing Oven Control Knobs: 1 Be sure the knobs are set to �OFF� 2 Pull each knob straight off. 3 Wash the knobs in warm.sudsy water. 4. The knobs are not interchangeable. Make sure you put the adjustable Oven Temperature Control Knob on the right place. and the nonadjustable Oven Selector Knob on the other. Removing surface units and reflector bowls: First. be sure the Surface Unit Controls are all �OFF� and that the surface units are cool. See where the surface units plug into the range? Lift each surface unit about an Inch (2.5 cm) at the edge away from the plug-in (receptacle). Pull the unit straight away from the plug-in. Do not wash surface units; they will burn themselves clean during normal use. Lift out the reflector bowls.
To remove surface unit. lift and pull straight out.
Replacing reflector bowls and surface units: 1 Be sure the surface unit controls are on �OFF.�
;: Hold when surface replacing. unit level
Put the reflector bowls back into their places. Make sure you can see the plug-ins (receptacles) for the surface units through the square hole in the side of each bowl. 3. Hold the surface unit level with the prongs (terminals) pointing at the plug-in. 4. Wrth the prongs started in the plug-in. start pushing in on the surface unit. At the same time. lift a little on the side of the surface unit that�s by the plug-in. 5. Make sure the surface-unit prongs are pushed into the plug-in as far as they will go. The surface unit will fit into the reflector bowl and be level when everything has been done right.