|
|
|
Who's Online
There currently are 6043 guests online. |
|
Categories
|
|
Information
|
|
Featured Product
|
|
|
 |
|
|
There are currently no product reviews.
 ;
helpful manual.good service.Quick response.will use again
 ;
Speedy confirmation to my order , with elaborate instructions .
Item Email , received immediately as desired by me.
A Pleasant & Satisfying Transaction.
;
I was searching for this manual at last i got it from this web
;
What can i say but i would have been lost without your support.
Thank You!
;
Très satisfait ! envoi rapide, Grand catalogue disponible. Many thanks !
Choosing
the proper
location
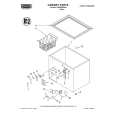
Read the following items before choosing the location for the freezer. See �Completing the installation� below before sliding freezer into place. 1. Pick a safe place, indoors, away from flammables such as gasoline. 2. Check the strength of the floor. It should hold the weight of a fully loaded freezer. 3. Allow at least 3 inches (7.5 cm) of air space on both sides of the freezer and 2 inches (5 cm) between the back of the freezer and the wall. Leave room above the freezer to open the lid. 4. It should not be necessary to remove the lid during installation. If, for any reason, the hinges need adjustment, see the label on the back of your freezer and contact an authorized Roper service company. Do not cover the freezer with items such as blankets, sheets, tablecloths, etc. This reduces air circulation.
NOTE:
Room to open Ild
2 inches at back
Completing
the installation
Level the freezer from side to side and front to back so that the lid will seal properly. Use shim(s) to level the freezer if necessary.
Installing
(on some
the defrost
drain cover
models)
1. Remove defrost drain cover from the
literature package. 2. Push drain cover into drain hole as illustrated.
6
|
|
|
> |
|