|
|
|
Who's Online
There currently are 5932 guests online. |
|
Categories
|
|
Information
|
|
Featured Product
|
|
|
 |
|
|
There are currently no product reviews.
 ;
thanks for this download i got a pioneer bdp-lx70a blu-ray player and it had no manual i search everywhere on the internet and came across owner-manuals.com and i found that it was so easy to find and downloaded from this site if i ever need a manual again this would be the first place that i would come too thanks guys
;
Superb! It's the original manual. We can now use our old calculator with its full function.
;
This is a very well written and comprehensive manual. It answered all our queries.
;
Excellent copy that was delivered within 12 hours and solved my problem.
 ;
I did not have the manual for a Whirl Pool gas dryer, therefore I purchased it from Owner-manuals. This is exactly what I needed. Thank you for the service.
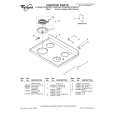
Oven Vent
Baking and Roasting
Before baking and roasting, position the racks according to the �Positioning Racks and Bakeware� section. When roasting, it is not necessary to wait for the oven to preheat before putting food in, unless recommended in the recipe. To Bake or Roast: 1. Push in and turn the oven control knob to the desired temperature setting. The OVEN ON and OVEN HEATING lights will turn on and the set temperature will appear in the display for 5 seconds. On some models, set the oven selector to BAKE and turn the oven temperature control knob to the desired temperature setting. The OVEN ON indicator light will turn on and will turn off once the oven is preheated. 2. Place food in oven. The bake and roasting elements will turn on and off to keep the oven temperature at the setting. The OVEN ON indicator light(s) will turn on and off with the elements. 3. Push in and turn oven control knob to OFF when finished. On some models, turn both the oven selector and oven temperature control knob to OFF. The OVEN ON indicator light will turn off.
1
1. Oven Vent (coil element model)
1
1. Oven Vent (ceramic glass model)
The oven vent releases hot air and moisture from the oven, and should not be blocked or covered. Doing so will cause poor air circulation, affecting cooking and cleaning results. Never set plastics, paper or other items that could melt or burn near the oven vent. On coil element models, the element can be used when the oven is in use as long as the cookware does not extend more than 1 in. (2.5 cm) over the element. On ceramic glass models, Cooktop Polishing Creme can be used to minimize soiling in the vent area. See �Assistance or Service� section to order.
Broiling
Broiling uses direct radiant heat to cook food. Changing the temperature when broiling allows more precise control. The lower the temperature, the slower the cooking. Thicker cuts and unevenly shaped pieces of meat, fish and poultry may cook better at lower broiling temperatures. s Use only the broiler pan and grid provided with the range. It is designed to drain juices and help prevent spatter and smoke.
s
For proper draining, do not cover the grid with foil. The bottom of the pan may be lined with aluminum foil for easier cleaning. Trim excess fat to reduce spattering. Slit the remaining fat on the edges to prevent curling. Pull out oven rack to stop position before turning or removing food. Use tongs to turn food to avoid the loss of juices. Very thin cuts of fish, poultry or meat may not need to be turned. After broiling, remove the pan from the oven when removing the food. Drippings will bake on the pan if left in the heated oven, making cleaning more difficult.
To Minimize Soiling (ceramic glass models):
1. Use the Self-Cleaning cycle often, before the oven becomes too soiled. 2. Before Self-Cleaning, apply Cooktop Polishing Creme on the control panel directly above the vent area. On stainless steel models, do not allow creme to contact stainless steel. 3. Rub creme into surface with a damp paper towel or soft cloth. Continue rubbing until white film disappears.
s
s
s
Before broiling, position rack according to Broiling Chart. It is not necessary to preheat the oven before putting food in unless recommended in the recipe. Position food on grid in the broiler pan, then place it in the center of the oven rack. Close the door to the broil stop position to ensure proper broiling temperature.
12
|
|
|
> |
|