|
|
|
Who's Online
There currently are 5779 guests online. |
|
Categories
|
|
Information
|
|
Featured Product
|
|
|
 |
|
|
There are currently no product reviews.
 ;
Very satisfied! I was searching for several days, but nope; till I discovered your webside and there it was at a very reasonable price. Keep up the good work!
Paul
Flanders
 ;
Generally speaking good copy; a few pages too hard contrast...
Good service and communication.
;
I purchased the unit from a private party and the original owners manual was not available. Having the ability to download it was extremely helpful and clarified operating the equipment immensely. This is a complicated unit and without the manual I would not have been able to maximize it's potential. Thank you.
;
Being a user of older radios of many kinds, preferring them over more modern rigs, this manual was invaluable in the programming of my two. I now know for certain what the assorted buttons functions are, and am very grateful to have found this excellent site. Many thanks for your assistance, Tony.
;
Clear and easy to read. All details as expected. Price acceptable , and quick delivery.
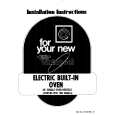
Using your oven
Automatic MEALTIMERClock Manual Oven Light Switch Oven Selector Oven Signal Light
Minute
Timer
Start Time Knob
Stop Time Knob
Adjustable
Oven Temperature
Control
SETTING
THE CONTROLS
goes off.
5. Put food in the oven.
6.
When done OFF.
baking,
turn both knobs to
During baking, the elements will turn on and off to help hold the oven temperature at the setting. (The top element will never turn red, but will be hot.) The Slgnal Light will turn on and off with the elements.
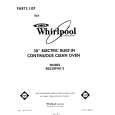
RESETTING THE OVEN TEMPERATURE CONTROL
Does your new oven seem to be hotter or colder at the same settings than your old oven? The temperature setting in your old oven may have changed gradually over the years. The accurate setting of your new oven can seem different If you think the oven temperature needs adjusting, follow these steps:
OFF OFF OFF
Locking
Screw
Tooth
Notches
Tooth
Notches
1.
Pull out the center of the Oven Temperature Control.
2.
loosen the locking screw.
3. To lower the tem4. perature, move black ring so tooth is closer to LO. Each notch equals about 109 (5-C). screw. Replace the knob.
To raise the temperature, move black ring so tooth IS closer to HI Each notch equals about 10 F (5 C].
Tighten
the locking
l Tmk
|
|
|
> |
|