|
|
|
Who's Online
There currently are 5949 guests online. |
|
Categories
|
|
Information
|
|
Featured Product
|
|
|
 |
|
|
There are currently no product reviews.
 ;
Excellent manual - just what I needed. Although currently available only in German, their are lots of pictures which makes it all very clear.
;
PHILIPS PE1642 Owner's Manual
Hi,
you have complet fullfilled my expectance.
Price is OK.
Robert Schmid
 ;
Came in the mail within a few hours. Gave clear instruktion on maintaines. Is of great use to have this manual in house
;
Easy to access. Clear instructions. No problems. Printed fine.
;
Great scan but please note that it is entirely in GERMAN.
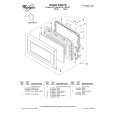
PARTS AND FEATURES
This manual may cover several different models. The model you have purchased may have some or all of the features shown here. The appearance of your particular model may differ slightly from the illustrations in this manual.
MICROWAVE OVEN CONTROL
A
B
C
D
E
I
H
A. Metal Shielded Window B. Model and Serial Number Plate C. Cooking Guide Label D. Microwave Oven Light (not shown) E. Control Panel
G
F. One-Touch Door Open Button G. Removable Turntable Support H. Glass Turntable
F
I. Door Safety Lock System
Turntable
A
B C D
A. Turntable B. Hub C. Support D. Shaft
Display
When power is first supplied to the microwave oven, �PLEASE SET TIME OF DAY� scrolls across the display, and then a �:� will appear on the display and 1 tone will sound. If at any other time the above text scrolls, and is followed by a �:� on the display, a power failure has occurred. Touch OFF/CANCEL and reset the Clock if needed. When the microwave oven is in use, the display shows cooking power, quantities, weights and/or prompts. When the microwave oven is not in use, the display shows the time of day or Timer countdown.
The turntable rotates in both directions to help cook food more evenly. Do not operate the microwave oven without the turntable in place. See �Assistance or Service� to reorder any of the parts.
To Install:
1. Place the support on the oven cavity bottom. 2. Place the turntable on the support. Fit the raised, curved lines in the center of the turntable bottom between the three spokes of the hub. The rollers on the support should fit inside the turntable bottom ridge.
Start/Enter
The START/ENTER pad begins any function. If cooking is interrupted, touching START/ENTER will resume the preset cycle.
6
|
|
|
> |
|