|
|
|
Who's Online
There currently are 5920 guests online. |
|
Categories
|
|
Information
|
|
Featured Product
|
|
|
 |
|
|
There are currently no product reviews.
 ;
Actually, I was looking for this information for 3 years!...now thanks to you, the manual is on my hands and of great help, cause I understand now where I was doing wrong connections and wires...excellent, I'll be back to you if in need, thank you.
 ;
This manual covers the main equipment features only. While it also includes the procedure for saving and loading from the now long obsolete memory cards it does not mention the how to operate with the optional floppy drive interface so I am still at a loss about how to use this! Note that there is a separate manual covering the MIDI interface and programming via the keyboard, not included in this download. You will also need to get hold of this if you want to use the MIDI interface properly. Basically there is little difference between this manual and the free to download manual for the similar PR60 model.
;
Good list of manuals. I found a very rare one and easily get. Should be promptly to download, as we must to wait hours even after confirmed payment.
;
The manual was properly scanned and perfectly readable. The only small problem is that I couldn't use my dear Ctrl + F to find a word I needed.
;
Nothing wrong with the manual or the delivery - came to me the same day I ordered it. But afterwards I realized that I ordered the wrong manual. Probably better with the Quick start - version. So maybe it would be better if we could see a list with inhold for each manual before ordering?
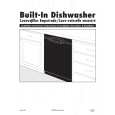
BUILT-IN TALL-TUB DISHWASHER
PRODUCT DIMENSIONS
INCHES
Keep back free of drain inlet water and electrical.
CENTIMETERS
A
Preferred drain area
23 7/8 19 1/2 23 7/8 33 1/2-35 1/4
60.6 49.5 60.6 85.1-89.5
Preferred drain area
B C D
MODEL SKUs
MDB5600AWW MDB5600AWB MDB5600AWQ MDB5600AWS
A
D
B
C
Style of product may vary from picture
NOTES:
1. Minimum 32� drain loop, 1/2� inside diameter minimum. Floor drains require a siphon break. 2. Connections preferably located toward left side of dishwasher. Care should be taken to route plumbing away from motor and blower (if equipped). 3. Electrical and plumbing should meet all local and national codes. 4. Electrical and water supplies should enter cabinet opening on the �oor, or through the back or side walls, as shown in the shaded area of the drawing. 5. When installing dishwasher in or near a corner, allow enough room for door to open without interfering with cabinet drawers or hardware. Electrical requirements: Adequately wired individual 120V A/C, 60Hz approved electrical circuit. Use required fuse (15 amp) or comparable circuit breaker.
Important: Because of continuing product improvements, Maytag reserves the right to change speci�cations without notice. Dimensional speci�cations are provided for planning purposes only. For complete details see installation instructions that accompany each product before selecting cabinetry, making cutouts or beginning installation.
2005-05-06 at 09:16:17 CDT
|
|
|
> |
|