|
|
|
Who's Online
There currently are 5857 guests online. |
|
Categories
|
|
Information
|
|
Featured Product
|
|
|
 |
|
|
There are currently no product reviews.
 ;
The manual was exactly what I wanted and I found it nowhere else. Thanks!
;
Having purchased a 1994 Kenwood music system from a Charity shop in 2013 (it was a high end product in its day), I found myself not quite knowing where to plug in what, and how to do this, that and the next thing. I needed a Manual, and after failure with another online 'Manual provider' I found Owner Manuals dot com. Well, I wasn't sure, but it was only $5, and if things didn't work out, I wouldn't have lost much...
But things DID work out. After paying my childrens inheritance money, $4.99, I was sent a Manual for my Kenwood System very quickly. Alas, it was in German, and being Scottish, I could not read it or get my system in order from it...a rapid email to them brought the English Manual in short order, and my retro-system was and IS up and running in it's regulation settings.
I am very grateful to http://www.owner-manuals.com for their quick service and for even having such an obsolete Manual in the first place! If you need a Manual for ANYTHING, try here first. I wouldn't be surprised if I bought a 1928 Marconi radio, and got the user Manual for THAT here too!
Top marks.
John Copeland
Glasgow
Scotland
;
I was so happy that the owner's manual was available. It is well written and helped me to use the radio/CD player/recorder without problems. Thanks for making it available.
Irene Lambert
;
Excellant!!! Very quick and easy....Best $4.99 I have spent in a very long time..
I highly recommend this.
;
Thanks so much for the Owner's manual for my Sony PS - FL1. I had purchased the turntable off of eBay. It came in and looked great. Packed well and appeared to be great. I balanced and aligned the tone are and hooked it up. When trying to play a record the tone are would move to the right place and just before it would drop to play it moved back off the edge of the record before touching down. I searched the net for an answer to this issue. No luck. Then I purchased the owners manual and sure enough there was a place to adjust where the stylus touched down. That adjustment solved the problem and saved me a $35 feet to have the player checked out. The manual is well written and easy to understand. It is a must have for anyone with this front loading Sony turntable.
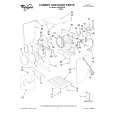
Controls
The control panel is simple to understand and easy to operate. The illustrations below define the knobs and buttons, and the paragraphs define the purpose of each.
Stop Position
Turn the cycle knob to the Stop position at any time.
Start Button
After you have selected a cycle and temperature, press this button to start the cycle. Indicator light will glow to indicate the cycle has started.
Power
This button switches the power to the machine on and off. The indicator light will glow to indicate the power is on.
Indicator Light
This light indicates when the power is on or that a cycle has started.
Drying, Cycle and Temperature Tips
Select the correct cycle and temperature for your load. Your dryer tumbles the load without heat during the last few minutes of all cycles to make the load easier to handle and to reduce wrinkling. After the cool-down cycle ends, the light flashes, and an end-of-cycle signal sounds to indicate the cycle is complete.
Drying tips
s s
Follow care label directions when they are available. Remove the load from the dryer as soon as tumbling stops to reduce wrinkling. This is especially important for permanent press, knits and synthetic fabrics. Avoid drying heavy work clothes with lighter fabrics. This could cause overdrying of lighter fabrics, leading to increased shrinkage or wrinkling. Dry most loads using an automatic cycle. Line dry bonded or laminated fabrics.
s
Temperature
The Temperature Control button lets you select between a normal and low drying temperature. NOTE: Always refer to the care label on the garment to determine whether it can be tumble dried.
Cycle and temperature tips
s s
NOTE: If you have questions about drying temperatures for various loads, refer to the care label directions.
Normal
The Normal temperature setting is for sturdy fabrics, such as cotton, linen and denim. If the Temperature Control button is not pressed in, the temperature setting is Normal.
Cycles
Automatic Cycles
When you are using the Auto Moisture Sensing Cycle, two metal strips (sensors) located on the dryer baffles determine the dryness of the load. The metal strips help detect the amount of moisture left in the clothes as they pass. When there is moisture left in the clothes, the machine will continue to run. As clothes begin to dry, the amount of water left in the clothes decreases, and the timer advances through the remainder of the cycle. When the selected dryness level is reached, the dryer goes into a cool down period of up to 15 minutes. Automatic cycles may be used for most loads. Automatic cycles give the best drying results in the shortest time. Drying time varies according to the type of fabric, size of the load, and dryness setting. After drying a load, check the dryness. s If the load is drier than you like, select a setting closer to Less Dry the next time you dry a similar load.
s
Low
The Low setting is for synthetics, such as cotton/polyester blend, rayon, acetate, washable silk or nylon. If the Temperature Control button is pressed in, the temperature setting is Low.
Cycle Knob
Turn this knob to the recommended setting. Indicator light will flash to indicate a cycle has been selected. See �Drying, Cycle and Temperature Tips.�
If a load is not as dry as you like, complete drying using a Timed cycle. Select a setting closer to More Dry the next time you dry a similar load.
15
|
|
|
> |
|