|
|
|
Who's Online
There currently are 6043 guests online. |
|
Categories
|
|
Information
|
|
Featured Product
|
|
|
 |
|
|
There are currently no product reviews.
 ;
This manual covers the main equipment features only. While it also includes the procedure for saving and loading from the now long obsolete memory cards it does not mention the how to operate with the optional floppy drive interface so I am still at a loss about how to use this! Note that there is a separate manual covering the MIDI interface and programming via the keyboard, not included in this download. You will also need to get hold of this if you want to use the MIDI interface properly. Basically there is little difference between this manual and the free to download manual for the similar PR60 model.
;
Good list of manuals. I found a very rare one and easily get. Should be promptly to download, as we must to wait hours even after confirmed payment.
;
The manual was properly scanned and perfectly readable. The only small problem is that I couldn't use my dear Ctrl + F to find a word I needed.
;
Nothing wrong with the manual or the delivery - came to me the same day I ordered it. But afterwards I realized that I ordered the wrong manual. Probably better with the Quick start - version. So maybe it would be better if we could see a list with inhold for each manual before ordering?
 ;
Bought T4850 High End Tuner a few years ago, but i didn't know where all the buttons were used for. So i purchased the owners manual. Perfect! Just what i needed.
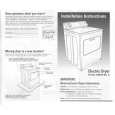
CHECKING YOUR VENT
Your dryer must be properly installed and vented to achieve maximum drying efficiency and shorten drying times. Use the minimum recommended installation clearances (found in your Installation Instructions) to avoid blocking the flow of combustion and ventilation air. Refer to your Installation Instructions for more information.
3. The exhaust vent can be routed up, down, left, right, or straight out the back of the dryer. Space requirements are listed in your Installation Instructions.
4. Use the straightest path possible when routing the exhaust vent. Use the fewest number of elbows and turns. Allow room when using elbows or making turns. Bend vent gradually to avoid kinking.
Fire Hazard Use a heavy metal vent. Do not use a plastic vent. Do not use a metal foil vent. Failure to follow these instructions can result in death or fire.
If the dryer is not properly installed and vented, it will not be covered under the warranty. NOTE: Service calls caused by improper venting will be paid for by the customer, whether it was a paid installation or selfinstalled. 1. Do not use plastic vent or metal foil vent. Use 4 in. (10.2 cm) metal or flexible metal vent. Do not kink or crush flexible metal vent. It must be completely extended to allow adequate exhaust air to flow. Check vent after installation. Refer to your Installation Instructions for proper length requirements of vent.
5. Use duct tape to seal all joints. Do not use screws to secure vent. Lint may catch on screws.
6. Clean exhaust vent periodically, depending on use, but at least every 2 years, or when installing your dryer in a new location. s Disconnect vent from the dryer and clean one section at a time until you reach the exhaust hood.
s
To clean out lint, use the hose attachment on your vacuum, or a pole or wire with a feather duster or rag attached. Be sure the flapper on the outside end of vent moves freely. When cleaning is complete, be sure to follow the Installation Instructions supplied with your dryer for final product check.
s
2. Use a 4 in. (10.2 cm) exhaust hood. Smaller hoods increase drying times.
2
s
1
4" (10.2 cm) 4" (10.2 cm)
6
|
|
|
> |
|