This manual covers the main equipment features only. While it also includes the procedure for saving and loading from the now long obsolete memory cards it does not mention the how to operate with the optional floppy drive interface so I am still at a loss about how to use this! Note that there is a separate manual covering the MIDI interface and programming via the keyboard, not included in this download. You will also need to get hold of this if you want to use the MIDI interface properly. Basically there is little difference between this manual and the free to download manual for the similar PR60 model.
Nothing wrong with the manual or the delivery - came to me the same day I ordered it. But afterwards I realized that I ordered the wrong manual. Probably better with the Quick start - version. So maybe it would be better if we could see a list with inhold for each manual before ordering?
Bought T4850 High End Tuner a few years ago, but i didn't know where all the buttons were used for. So i purchased the owners manual. Perfect! Just what i needed.
Text excerpt from page 8 (click to view)
Installation
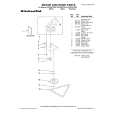
1. Remove the mounting screws attaching the foot pedal to the compactor. Remove foot pedal.
A
A
B
C
A B
C
A. Mounting screws B. Foot pedal
2. Remove mounting screws attaching the toe guard to the compactor. Remove toe guard. 3. Remove the mounting screws attaching the decorative panel to the compactor. Remove decorative panel and discard mounting screws. 4. Align the bottom of the custom panel with the bottom of the drawer front. 5. Secure the panel from the back using four #8 x 1" wood screws as shown. 6. Reinstall the toe guard using the existing screws and ¹��" washer. Then, reinstall the foot pedal.
D E F
A. Handle B. Custom panel C. Panel screw locations D. Toe guard E. Washer F. Toe guard screw
Custom Panel without Handle (for all C and S models) Dimensions
Use these dimension drawings to create a custom panel for use without a trim kit. The panel should be ¹��" (13 mm) min. thick.