|
|
|
Who's Online
There currently are 5940 guests online. |
|
Categories
|
|
Information
|
|
Featured Product
|
|
|
 |
|
|
There are currently no product reviews.
 ;
The manual was exactly what I wanted and I found it nowhere else. Thanks!
;
Having purchased a 1994 Kenwood music system from a Charity shop in 2013 (it was a high end product in its day), I found myself not quite knowing where to plug in what, and how to do this, that and the next thing. I needed a Manual, and after failure with another online 'Manual provider' I found Owner Manuals dot com. Well, I wasn't sure, but it was only $5, and if things didn't work out, I wouldn't have lost much...
But things DID work out. After paying my childrens inheritance money, $4.99, I was sent a Manual for my Kenwood System very quickly. Alas, it was in German, and being Scottish, I could not read it or get my system in order from it...a rapid email to them brought the English Manual in short order, and my retro-system was and IS up and running in it's regulation settings.
I am very grateful to http://www.owner-manuals.com for their quick service and for even having such an obsolete Manual in the first place! If you need a Manual for ANYTHING, try here first. I wouldn't be surprised if I bought a 1928 Marconi radio, and got the user Manual for THAT here too!
Top marks.
John Copeland
Glasgow
Scotland
;
I was so happy that the owner's manual was available. It is well written and helped me to use the radio/CD player/recorder without problems. Thanks for making it available.
Irene Lambert
;
Excellant!!! Very quick and easy....Best $4.99 I have spent in a very long time..
I highly recommend this.
;
Thanks so much for the Owner's manual for my Sony PS - FL1. I had purchased the turntable off of eBay. It came in and looked great. Packed well and appeared to be great. I balanced and aligned the tone are and hooked it up. When trying to play a record the tone are would move to the right place and just before it would drop to play it moved back off the edge of the record before touching down. I searched the net for an answer to this issue. No luck. Then I purchased the owners manual and sure enough there was a place to adjust where the stylus touched down. That adjustment solved the problem and saved me a $35 feet to have the player checked out. The manual is well written and easy to understand. It is a must have for anyone with this front loading Sony turntable.
Tones
Tones are audible signals, indicating the following:
Child Lock
The Child Lock shuts down the control panel pads to prevent unintended use of the microwave oven. When the control is locked, only the Vent Fan and Light pads will function. To Lock/Unlock Control: The microwave oven and Timer must be off. Touch and hold START for 5 seconds until 2 tones sound and a lock icon appears on the display. Repeat to unlock and remove the lock icon from display.
One tone
â� â�
Valid entry (short tone) End of Timer countdown (long tone) Reminder, repeat each minute after the end-of-cycle tones End of stage in multistage cooking Turn food during defrost cycle (short tones) Hidden feature has been entered or exited
Two tones
â� â� â� â�
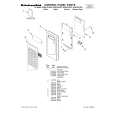
Vent Fan
The vent fan has speeds ranging from 1 (LOW) to 5 (HIGH). The first time the Vent Fan is turned on after power is supplied to the microwave oven, it will start at speed level 1. Each time the fan is turned on, it will start at the speed level that was used last. To protect the microwave oven, the vent fan will automatically turn on at the HIGH setting if the temperature from the range or cooktop below gets too hot. It may stay on for up to one hour to cool the microwave oven. When this occurs, the VENT FAN pads will not function.
Three tones
â�
Invalid entry
Four tones
â�
End of cycle
To Turn Off/On Valid Entry Tones: Touch and hold the number pad 1 for 5 seconds until 2 tones sound. Repeat to turn tones back on. To Turn Off/On All Tones: Touch and hold the number pad 2 for 5 seconds until 2 tones sound. Repeat to turn tones back on.
To Turn Vent Fan On/Off:
1. Touch VENT FAN ON-OFF pad. 2. Touch HIGHER or LOWER pad to increase or decrease the fan speed. The display will show �FAN� and a number between 1 and 5 to indicate fan speed. After 2 seconds, the display returns to previous display.
Timer
The Timer can be set in minutes and seconds, up to 99 minutes 99 seconds and counts down the set time. NOTE: The Timer does not start or stop the microwave oven. When the Timer is in use, the microwave oven can still operate. To see the time countdown for 5 seconds while the microwave oven is in use, touch TIMER.
Cooktop Light
The cooktop light has 3 settings: on, night and off. To Turn On/Night/Off: Touch LIGHT ON-NIGHT-OFF repeatedly to cycle through settings.
To Set:
1. Touch TIMER. If no action is taken after 1 minute, the display will return to the time of day mode. 2. Touch the number pads to set the length of time. 3. Touch START. If not touched within 5 seconds, �START?� will appear on the display. If not touched within 1 minute, the display will return to the time of day. When the set time ends, �END� will appear on the display and 1 long tone will sound. 4. Touch TIMER or CANCEL anytime to cancel the Timer. If using the Timer during a cooking function, do not touch CANCEL to cancel Timer, as the cooking function will also cancel. The time can be reset during the countdown by repeating the above steps.
Demo Mode
The Demo Mode is ideal for learning how to use the microwave oven. When set, functions can be entered without actually turning on the magnetron. The microwave oven light will come on, the fan will run and, if on, the turntable will rotate. To Turn On/Off: The microwave oven and Timer must be off. Touch and hold TIMER for 5 seconds until 2 tones sound and �d� appears on the display. Repeat to turn off and remove �d� from the display.
8
|
|
|
> |
|