|
|
|
Who's Online
There currently are 6043 guests online. |
|
Categories
|
|
Information
|
|
Featured Product
|
|
|
 |
|
|
There are currently no product reviews.
 ;
Last week I bought a second hand BAUKNECHT TRK4850 DRYER. It is a professional machine with many programs and switch options. I feared it would be a huge quest to find a manual. I was delighted when I found owner-manuals.com. After payment I received the file to download the next day already. The quality is great. I am very happy. Thanks!
but kindly the distributions of the operating programs not find in the owners manual,can you help me to understand the operating programs instructions thank you
;
Very good copy, very readable and easy transaction as always.
;
It is perfect, exactly what we needed. It's like the paper version but less clutter.
 ;
Received my manual within 24 hours. Very clear scan of the manual I needed. Thanks!
;
Very clear scan, I recommend it. Definitely a must have for any 3362 owner.
Alpine could have written a slightly more complete manual, though. It's already pretty huge, but the unit has so many functions, I feel some more explanation would have been better.
Yamaha's manual of their comparable YDSP-1 is a little better in my opinion.
Using and Caring for Your Oven
Using and replacing the oven light(s)
Your oven may have a standard oven light or two side halogen lights. The oven light(s) will come on when you open the oven door. To turn the light(s) on when the oven door is closed, press the Oven Light pad on the control panel. Press the pad again to turn off the light(s).
OVEN LIGHT OVEN LIGHT
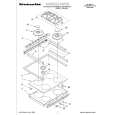
Replacing oven lights (models with side halogen lights):
1. Unplug range or disconnect power. 2. Make sure the oven is cool before replacing the light bulb.
Replacing the oven light (models with light on back wall):
1. Unplug range or disconnect power. 2. Make sure the oven is cool before replacing the light bulb. 3. Remove glass light cover by grasping front edge of cover and pulling it away from the side wall of the oven. 4. Remove the light bulb from its socket. Replace the bulb with another halogen bulb (12 volt, 5 watt maximum, available at most hardware stores). 5. Replace the light cover by snapping it back into wall. 6. Plug in range or reconnect power. NOTE: The oven lights will not work during the Self-Cleaning cycle.
3. Remove the glass bulb cover in the back of the oven by turning it counterclockwise. 4. Remove the light bulb from its socket. Replace the bulb with a 40-watt appliance bulb. 5. Replace the bulb cover by turning it clockwise. 6. Plug in range or reconnect power. NOTE: The oven light will not work during the Self-Cleaning cycle.
45
|
|
|
> |
|