I AM HIGHLY IMPRESSED BY THE EASE OF USE OF THIS DOWNLOAD SERVICE. INSTRUCTIONS ARE CLEAR AND SIMPLE TO FOLLOW....EVEN BY TECHNOPHOBES SUCH AS MYSELF. THE EMAILS POINT YOU IN THE RIGHT DIRECTION...ITS SO EASY PEASY. THE DOWNLOAD CHOICE OF USER MANUALS IS EXTENSIVE AND I COULD NOT FIND A CHEAPER OR MORE EFFICIENT SERVICE ON THE INTERNET. I COULD NOT HAVE MADE A BETTER CHOICE OF INFORMATION PROVIDER. SHOULD I EVER NEED ANOTHER USER MANUAL, THEN THIS IS THE FIRST CHOICE SITE. COULD NOT BE BETTER PLEASED!!!!!!!...MANY THANXES FROM JIM BURNS
I was impressed with the quality of service (frequent e-mails to let you know the status of your order), and the speed at which the download became available. The manual was a life saver and was not easy to track down. Thank you for such an excellent service.
the manual was just what i wanted it had all the revelent information required to operate the hifi .Iwould use any manual i downloaded for any item which needs a manual
Die gewünschte Bedienungsanleitung wurde vereinbarungsgemäß in deutsch bereitgestellt. Sie ist gut lesbar. Kein Kauderwelsch.
Danke für den Service.
Text excerpt from page 3 (click to view)
Energy saving tip
If you plan to be away from home more than two days, you may want to turn the temperature control to �OFF� to eliminate energy consumption during your absence. You will not save any energy by turning the dispenser off at night and back on the next morning.
Caring for your hot water dispenser
Winterizing
Be sure to safeguard your dispenser when it is exposed tank to prevent the water inside from freezing. Freezing to freezing temperatures. Drain the storage will ultimately damage the storage tank:
To Drain:
the power cord. 2. Turn Temperature Control Knob to �OFF.� 3. Run hot water dispenser until water is cold. 4. Place at least a 3-quart capacity container under the drain plug on the storage tank. 5. Unscrew the drain plug with a %a� wrench and allow all water to drain. 6. Replace and tighten the drain plug. Do not
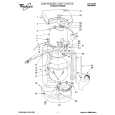
overtighten. 1. Unplug TEMPERATURE CONTROL KNOB -
DRAIN PLUG \
When
ready
to use the dispenser
again,
see �Using your hot water dispenser.�
to the unit will result and is not covered
CAUTION: DO NOT TURN UNIT ON IF TANK IS EMPTY. Damage by the warranty
Cleaning the Spout Screen
If you have very hard water, it may be necessary to clean the Spout Screen occasionally
To Remove:
the two spout screws. 2. Remove spout base plate. 3. Pull the screen assembly out of the hot water tube.
1. Remove
To Clean:
1. Use a small brush and vinegarto
remove for
deposit 2. If deposit has hardened, soak in vinegar an hour or two. Then brush clean. 3. Replace screen assembly in tube and screw plate back onto spout.