|
|
|
Who's Online
There currently are 6043 guests online. |
|
Categories
|
|
Information
|
|
Featured Product
|
|
|
 |
|
|
There are currently no product reviews.
 ;
Thank you for your manual It has the basic things to and i use the Oszi for Longer Time.
THX
;
Actually, I was looking for this information for 3 years!...now thanks to you, the manual is on my hands and of great help, cause I understand now where I was doing wrong connections and wires...excellent, I'll be back to you if in need, thank you.
 ;
This manual covers the main equipment features only. While it also includes the procedure for saving and loading from the now long obsolete memory cards it does not mention the how to operate with the optional floppy drive interface so I am still at a loss about how to use this! Note that there is a separate manual covering the MIDI interface and programming via the keyboard, not included in this download. You will also need to get hold of this if you want to use the MIDI interface properly. Basically there is little difference between this manual and the free to download manual for the similar PR60 model.
;
Good list of manuals. I found a very rare one and easily get. Should be promptly to download, as we must to wait hours even after confirmed payment.
;
The manual was properly scanned and perfectly readable. The only small problem is that I couldn't use my dear Ctrl + F to find a word I needed.
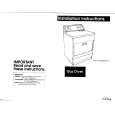
Models EL6050/GL6050
(Check behind dryer door for model number)
Temperature selector
Cycle � control
screen I I
Model and serial numb ler
plate
Access panel (gas model only)
Select cycle and setting
3. Adjusting the dryness levels. Set the cycle control knob to Normal Dry in the automatic cycle. When dryer stops, feel the items for dryness. If items are drier than you like, set the control to the right of Normal Dry the next time you dry that kind of load. If the items are not as dry as you like, set the control to the left of Normal Dry the next time to dry that kind of load. The cycle control knob will not move until the clothes load is almost dry, or the cool-down time of the cycle has been reached. After the cool-down cycle is finished, the cycle control knob automatically moves to OFF and the dryer stops tumbling.
C. Timed Dry
Use this cycle for drying a load for a set time between 10 and 70 minutes. To operate, turn cycle control knob to the number of minutes you want. Push the start button. (The last 5 minutes of this cycle are without heat to help make the load easier to handle and to reduce wrinkling.) NOTE: Overdrying can cause shrinkage, static cling and damage to some fabrics.
D. Damp Dry
Use this setting to dry damp items or to dry items to damp level (for example heavy cottons such as jeans which you do not want to become stiff or cotton clothes which are easier to press when damp).
A. Automatic Cycles
The automatic cycles let you select the degree of dryness you want. A thermostat senses the air temperature and automatically shuts the dryer off when the selected dryness is reached. 1. Use Auto-Sense Heavy to dry heavy and medium-weight cotton or linen items. The load tumbles without heat the last 5 minutes for easier load handling. 2. Use Auto-Sense Permanent Press to dry permanent press, knits and other synthetic items. The load tumbles without heat during the last 10 minutes to help prevent wrinkles and to make the load easier to handle. Page 6
E. Wrinkle Free
Use this cycle to remove wrinkles from clothing that has been packed in a suitcase, closet or not removed promptly from dryer. To operate, turn cycle control knob to WRINKLE FREE; set the temperature selector knob to KNITS/LOW and push the start button. The load will tumble in heated air for 15 minutes and without heat for 5 minutes more. For best results, put only a few items in the dryer and remove as soon as the dryer stops. Fold or hang on hangers immediately.
B. No Heat/Fluff
Use for rubber, plastic and heatsensitive fabrics. (See chart on Page 3 for time settings.) To operate turn cycle control to number of minutes you want in the No Heat/Fluff cycle. Push the start button. Cycle may need to be reset for additional time. NOTE: A temperature setting does not need to be selected in this cycle.
|
|
|
> |
|