|
|
|
Who's Online
There currently are 5928 guests online. |
|
Categories
|
|
Information
|
|
Featured Product
|
|
|
 |
|
|
There are currently no product reviews.
 ;
The manual was everything that I wanted. Clearly printed and delivered in very quick time. Would certainly use again if I needed a manual in the future
;
I received the manual in correct time. It was a perfect help for me.
;
excellent quality, contains circuits and scan quality, 226 pages
 ;
Great price for the manual and easy to locate on the site and download. I would buy again.
;
Very good copy of Manual, clear and easy to print off, arrived very promptly and reasonably priced. Thanks, I will use you again
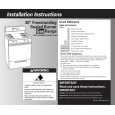
To Clean:
1. Remove the burner cap from the burner base and clean according to �General Cleaning� section. 2. Clean the gas tube opening with a damp cloth. 3. Clean clogged burner ports with a straight pin as shown. Do not enlarge or distort the port. Do not use a wooden toothpick. If the burner needs to be adjusted, contact a trained repair specialist.
To Clean:
1. Remove the surface burner grates. 2. Lift-up the cooktop. See the �Lift-up Cooktop� section. 3. Clean clogged burner ports with a straight pin as shown. Do not enlarge or distort the port. Do not use a wooden toothpick. If the burner needs to be adjusted, contact a trained repair specialist.
4. Replace the burner cap, making sure the alignment pins on the cap are properly aligned with the burner base.
4. Close the cooktop. 5. Replace surface burner grates. 6. Turn on the burner. If the burner does not light, do not service the open burner yourself. Contact a trained repair specialist.
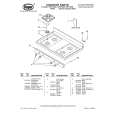
1
Lift-up Cooktop
(on some models)
2
The lift-up cooktop provides easy access for cleaning beneath. Be careful not to drop the cooktop. Damage could occur to the finish and the cooktop frame. For more information, see the �General Cleaning� section.
1. Incorrect 2. Correct
To Lift:
1. Lift up the cooktop by both front corners until the supports lock into place.
5. Turn on the burner. If the burner does not light, check cap alignment. If the burner still does not light, do not service the sealed burner yourself. Contact a trained repair specialist.
OPEN SURFACE BURNERS (on some models)
Burner ports: Check burner flames occasionally for proper size and shape as shown below. A good flame is blue in color, not yellow. Keep this area free of soil and do not allow spills, food, cleaning agents or any other material to enter the burner ports.
Ports
1" 2
To Replace:
1. Lift the cooktop from both sides while pressing the support rods back to unlock them. 2. Slowly lower the cooktop into place.
7
|
|
|
> |
|