|
|
|
Who's Online
There currently are 5918 guests online. |
|
Categories
|
|
Information
|
|
Featured Product
|
|
|
 |
|
|
There are currently no product reviews.
 ;
Thank you for providing this manual and at low cost.
The Philips scope is of excellent quality, longevity and build and had a couple of faults
when it was passed to me. Having the CCT diagrams is a blessing.
I have fixed the problems and also modded the scope to my requirements.
I have built a 24v Li-Ion pack for portable use from old but good laptop batts.
it is working beautifully and I am well pleased. Keep up the good work Guys.
 ;
manual was very helpful in learning how to propery use my washer. I could not find this manual anywhere else.
;
Awesome quality manual. You really saved my bacon with this one. Was looking for some specific information with regards to my "new" vintage VCR that didn't come with the owners manual. This site is truely a goldmine of available manuals. The quality of the scans are top notch.
Thank-you so much for this awesome manual. If you're looking for this Sony SL-HF400 owners manual, this is the one you NEED to buy. Definitely worth the money.
;
The manual was made available promptly. I is a clean scan of the original. I had no problem downloading it. The scan was well centered and cleanly formatted. It is as good a product as can be had without being the original document.
;
Received downlink in less then 8 hours, Item was in good copy condition, and told me how to program the clock timer. The price was very resonable, and the process was very automated and was GREAT to work with.
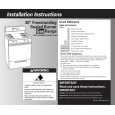
To Clean:
1. Remove the burner cap from the burner base and clean according to �General Cleaning� section. 2. Clean the gas tube opening with a damp cloth. 3. Clean clogged burner ports with a straight pin as shown. Do not enlarge or distort the port. Do not use a wooden toothpick. If the burner needs to be adjusted, contact a trained repair specialist.
To Clean:
1. Remove the surface burner grates. 2. Lift-up the cooktop. See the �Lift-up Cooktop� section. 3. Clean clogged burner ports with a straight pin as shown. Do not enlarge or distort the port. Do not use a wooden toothpick. If the burner needs to be adjusted, contact a trained repair specialist.
4. Replace the burner cap, making sure the alignment pins on the cap are properly aligned with the burner base.
4. Close the cooktop. 5. Replace surface burner grates. 6. Turn on the burner. If the burner does not light, do not service the open burner yourself. Contact a trained repair specialist.
1
Lift-up Cooktop
(on some models)
2
The lift-up cooktop provides easy access for cleaning beneath. Be careful not to drop the cooktop. Damage could occur to the finish and the cooktop frame. For more information, see the �General Cleaning� section.
1. Incorrect 2. Correct
To Lift:
1. Lift up the cooktop by both front corners until the supports lock into place.
5. Turn on the burner. If the burner does not light, check cap alignment. If the burner still does not light, do not service the sealed burner yourself. Contact a trained repair specialist.
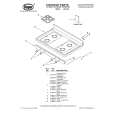
OPEN SURFACE BURNERS (on some models)
Burner ports: Check burner flames occasionally for proper size and shape as shown below. A good flame is blue in color, not yellow. Keep this area free of soil and do not allow spills, food, cleaning agents or any other material to enter the burner ports.
Ports
1" 2
To Replace:
1. Lift the cooktop from both sides while pressing the support rods back to unlock them. 2. Slowly lower the cooktop into place.
7
|
|
|
> |
|