|
|
|
Who's Online
There currently are 6043 guests online. |
|
Categories
|
|
Information
|
|
Featured Product
|
|
|
 |
|
|
There are currently no product reviews.
 ;
Received downlink in less then 8 hours, Item was in good copy condition, and told me how to program the clock timer. The price was very resonable, and the process was very automated and was GREAT to work with.
;
Fast service, document is OK. Thanks! Searched for it long time.
 ;
I was very pleased with the manual I got for my amateur (ham) radio. Without it I could not figure out how to input and/or change the P/L setting on my radio. It drove me nuts as the radio was essentially useless. That all changed when my manual came. Then it took only minutes and I was done. Now my radio works fine. This is an exceptionally good resource as it's a very easy and user friendly download. Thank you very much! Dziękujemy za!
;
It answered my question, which was how to load the paper. I did notice that the very end of the manual was not visible.
;
The product manual I received was exactly what I was looking for, delivered painlessly at a very fair price. I can't ask for any more than that.
To Adjust Oven Temperature Calibration (on models with manual oven control):
1. Make sure the oven temperature control knob is in the Off position. Pull oven temperature control knob straight off and turn it over.
OVEN USE
Odors and smoke are normal when the oven is used the first few times, or when it is heavily soiled. IMPORTANT: The health of some birds is extremely sensitive to the fumes given off. Exposure to the fumes may result in death to certain birds. Always move birds to another closed and wellventilated room.
Aluminum Foil
2. Loosen the locking screws inside the oven temperature control knob. IMPORTANT: Do not line the oven bottom with any type of foil, liners or cookware because permanent damage will occur to the oven bottom finish. s Do not cover entire rack with foil because air must be able to move freely for best cooking results.
s
B
To catch spills, place foil on rack below dish. Make sure foil is at least ½" (1.3 cm) larger than the dish and that it is turned up at the edges.
A
A. Locking screws B. Notches
Positioning Racks and Bakeware
IMPORTANT: To avoid permanent damage to the porcelain finish, do not place food or bakeware directly on the oven door or bottom.
3. Adjust temperature. To lower the temperature, hold the knob handle firmly and turn skirt counterclockwise to move the tooth a notch to the left. To raise the temperature, hold the knob handle firmly and turn the skirt clockwise to move the tooth a notch to the right. Each notch equals about 5°F (3°C).
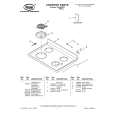
RACKS
NOTES: s Position racks before turning on the oven. s Do not move racks with bakeware on them.
s
Make sure racks are level.
To move a rack, pull it out to the stop position, raise the front edge, then lift out. Use the following illustration and chart as a guide.
A
B
5 4 3 2 1
C
A. Notches B. Tooth C. Skirt
4. Tighten the locking screws and replace knob.
10
|
|
|
> |
|