This manual covers the main equipment features only. While it also includes the procedure for saving and loading from the now long obsolete memory cards it does not mention the how to operate with the optional floppy drive interface so I am still at a loss about how to use this! Note that there is a separate manual covering the MIDI interface and programming via the keyboard, not included in this download. You will also need to get hold of this if you want to use the MIDI interface properly. Basically there is little difference between this manual and the free to download manual for the similar PR60 model.
Nothing wrong with the manual or the delivery - came to me the same day I ordered it. But afterwards I realized that I ordered the wrong manual. Probably better with the Quick start - version. So maybe it would be better if we could see a list with inhold for each manual before ordering?
Bought T4850 High End Tuner a few years ago, but i didn't know where all the buttons were used for. So i purchased the owners manual. Perfect! Just what i needed.
Text excerpt from page 6 (click to view)
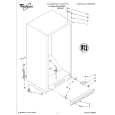
INS TAL LI NG Y O UR F R EE Z ER
Choosing the proper location
Read the following items before choosing the location for the freezer. See �Completing the installation� below before sliding freezer into place. 1. Pick a safe place, indoors, away from flammables such as gasoline. 2. Check the strength of the floor. It should hold the weight of a fully loaded freezer. 3. Allow at least 3 inches (7.5 cm) of air space at top and both sides of freezer. 4. Allow at least 1 inch (2.5 cm) of air space between the back of the freezer and the wall. 5. If the freezer is to be against a wall, you might want to leave extra space on the hinge side so the door can be opened wider. 3 inches min.
±
3 inches min.
±
Completing the installation
Level freezer so the door will stay open at any position. 1. Locate, remove and discard the 4 bolts that held the freezer in the shipping crate. 2. Locate the 2 front leveling legs taped among the packing materials. 3. Screw these legs into the front holes on the bottom of the freezer. The back of the freezer rests on 2 fixed supports. 4. Adjust the 2 front legs so freezer does not rock. 5. Connect freezer to proper electrical supply and attach retaining clip. (Refer to �Locating the proper electrical supply� on page 5.) 6. Slide freezer into place. 7. Place a level on top of the freezer�first side to side then front to back. Turn leg counterclockwise to raise a corner. Turn leg clockwise to lower a corner. 8. Repeat Step 7 until the freezer is level. 9. After freezer is fully loaded, recheck with level.