|
|
|
Who's Online
There currently are 6040 guests and
3 members online. |
|
Categories
|
|
Information
|
|
Featured Product
|
|
|
 |
|
|
There are currently no product reviews.
 ;
Manual was delivered in a timely manner and was all in English as advertised. The manuals I received when we moved into our flat were in German, Italian, and French. Having never used a steamer before, and not speaking/reading German very well, I needed an English Manual. this was a huge help.
 ;
Great Manual. This manual is available no where else. It was exactly what I was looking for. Only in German.
;
This GRUNDIG UV5A Owner Manual is not only an instruction manual but a total functional circuit description of the Multimeter and includes circuit diagram at the end pages. It is very helpful for repairing and calibrating the instrument. It is written in two languages English and German for international support. It was very easy to repair my unit with this document. Regards, Regis Pauly, Electrical Engineer.
;
The owner's manual was evetything I thought it would be. I was able to print it out using both sides of the paper in quick order, saving me a search online for a used one.
;
Хорошее качество сканирования.
Мануал пришел часов эдак через 12. В целом доволен.
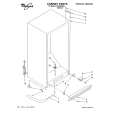
INS TAL LI NG Y O UR F R EE Z ER
Choosing the proper location
Read the following items before choosing the location for the freezer. See �Completing the installation� below before sliding freezer into place. 1. Pick a safe place, indoors, away from flammables such as gasoline. 2. Check the strength of the floor. It should hold the weight of a fully loaded freezer. 3. Allow at least 3 inches (7.5 cm) of air space at top and both sides of freezer. 4. Allow at least 1 inch (2.5 cm) of air space between the back of the freezer and the wall. 5. If the freezer is to be against a wall, you might want to leave extra space on the hinge side so the door can be opened wider. 3 inches min.
±
3 inches min.
±
Completing the installation
Level freezer so the door will stay open at any position. 1. Locate, remove and discard the 4 bolts that held the freezer in the shipping crate. 2. Locate the 2 front leveling legs taped among the packing materials. 3. Screw these legs into the front holes on the bottom of the freezer. The back of the freezer rests on 2 fixed supports. 4. Adjust the 2 front legs so freezer does not rock. 5. Connect freezer to proper electrical supply and attach retaining clip. (Refer to �Locating the proper electrical supply� on page 5.) 6. Slide freezer into place. 7. Place a level on top of the freezer�first side to side then front to back. Turn leg counterclockwise to raise a corner. Turn leg clockwise to lower a corner. 8. Repeat Step 7 until the freezer is level. 9. After freezer is fully loaded, recheck with level.
Lower
±
Raise
6
± ±
± ±
± ±
|
|
|
> |
|