|
|
|
Who's Online
There currently are 6043 guests online. |
|
Categories
|
|
Information
|
|
Featured Product
|
|
|
 |
|
|
There are currently no product reviews.
 ;
Hr, klasse , good manual, verry fast on my e-mail, very usefull manual. rgds; ahm zeegers
;
I received the owners manual complete download. Wow did it help me. So glad for your website. Can you include an ownersmanual for people lol!
Thanks, sure I will be back
;
fast response great copy easy to download quick to correct mistakes
;
This manual provided the necessary information to properly use the C-3 deck. The manual was an excellent reproduction and very clear.
;
Product was very good. Received quickly and complete
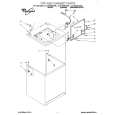
Removing
the crispers
and crisper
cover
Pull out to the stop, ill the front, and pull again.
To remove the crispers: I. Slide crisper straight out to the stop. 2. Lii the front and slide out the rest of the way. 3. Replace in reverse order. To remove the cover: 1. Push up the glass insert from the bottom, then slide out with both hands. 2. Lii front of cover frame. 3. Lift cover frame up and out.
To replace the cover: 1. Pit back of cover frame into notch supports on back
wall of refrigerator, then lower the front into place. 2. Make sure the front cover metal support is in the notches in the sides of the liner. NOTE: If the support is not positioned properly, the doors may not close all the way. 3. Slide back of glass insert into place, then lower front. Remove the glaea insert. Lift the cover front, then the back NOTE: Glass lnrert ie heavy. Handle it carefully.
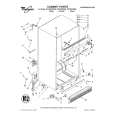
Adjusting
the crisper
humidity
control
You can control the amount of humidity in the rnoisturesealed crispers. Adjust the control to any setting between LOW and HIGH. l LOW (open) lets moist air out of the crisper for best storage of fruits and vegetables with skins. l HIGH (closed) keeps moist air in the crisper for best storage of fresh, leafy vegetables.
Adjusting
the half-width
freezer
shelf
Adjust the shelf according to the space you need in your freezer. Use the bottom position when you don�t need the shelf at all.
To adjust the shelf: 1. Remove items from the shelf.
2. 3. 4. 5. Lii shelf up at front. Pull shelf out to the stop. Lii back of shelf. Pull shelf out the rest of the way.
To replace the shelf: 1. Guide rear of shelf into desired guide.
2. Lift rear of shelf over stop. 3. Slide shelf in all the way. 4. Lower front into place.
11
|
|
|
> |
|