Nothing wrong with the manual or the delivery - came to me the same day I ordered it. But afterwards I realized that I ordered the wrong manual. Probably better with the Quick start - version. So maybe it would be better if we could see a list with inhold for each manual before ordering?
Bought T4850 High End Tuner a few years ago, but i didn't know where all the buttons were used for. So i purchased the owners manual. Perfect! Just what i needed.
Bought the used Philips car-radio. No manual! Found on this site a copy of the orginal English manual. I am very happy with it. Now I know how to setup and use my "new" car-radio.
Recommended site for everybody looking for a manual for (older) products!
Great deal, you are the only one on earth who could deliver this old manual. Thx so much and have nice chrismas
Text excerpt from page 10 (click to view)
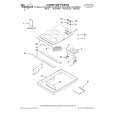
Adjusting
the refrigerator
shelves
Adjust the shelves to match the way you use your refrigerator.
To remove shelves: 1. Remove items from shelf.
2. Titt shelf up at front. 3. Lii back of shelf. 4. Pull shelf straight out.
To replace shelves: 1. Guide the rear shelf hooks into the slots
in the shelf supports on cabinet wall. 2. Tilt shelf up at front until hooks drop into slots. Lower front of shelf to level position.
Removing
the meat drawer
and cover
Lii the front, then the back.
Remove the meat drawer and cover for cleaning or moving to another shelf, if desired. Remove the meat drawer first.
To remove the meat drawer: 1. Slide the drawer straight out to the stop.
2. Lii the front. 3. Slide drawer out the rest of the way. 4. Replace in reverse order.
To remove the cover: 1. Remove the meat drawer.
2. Tilt front of cover up. 3. Pull cover up and out.
To replace the cover: 1. Fit bottom notches of cover over rear and
center cross bars of shelf. 2. Lower cover into place. 3. Replace the meat drawer.
Pull out to the stop, lift the front and pull again.
Removing
the crispers
To remove the crispers: 1. Slide the crisper straight out to the stop.
2. Lift the front. 3. Slide out the rest of the way. 4. Replace in reverse order.
Pull out to the top, lift the front and pull again.