|
|
|
Who's Online
There currently are 6011 guests and
4 members online. |
|
Categories
|
|
Information
|
|
Featured Product
|
|
|
 |
|
|
There are currently no product reviews.
 ;
Great price, Quick delivery, the document was very usefull A+++++++++++++++
;
Thank´s for your help, I already recived these manual from you
;
Thank you for your manual It has the basic things to and i use the Oszi for Longer Time.
THX
;
Actually, I was looking for this information for 3 years!...now thanks to you, the manual is on my hands and of great help, cause I understand now where I was doing wrong connections and wires...excellent, I'll be back to you if in need, thank you.
 ;
This manual covers the main equipment features only. While it also includes the procedure for saving and loading from the now long obsolete memory cards it does not mention the how to operate with the optional floppy drive interface so I am still at a loss about how to use this! Note that there is a separate manual covering the MIDI interface and programming via the keyboard, not included in this download. You will also need to get hold of this if you want to use the MIDI interface properly. Basically there is little difference between this manual and the free to download manual for the similar PR60 model.
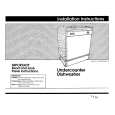
Storing
your
dishwasher
your
Moving or winterizing dishwasher
Protect your dishwasher and home against water damage due to freezing water lines. If your dishwasher is left in a seasonal dwelling or could be exposed to near freezing temperatures, have a qualified person do the following:
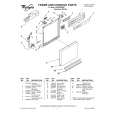
NOTE: Pump motor styles vary by model.
Refer to Figure 1 or Figure 2, depending on the style of your dishwasher. 1. Disconnect power supply to the dishwasher. 2. Turn off water supply to the dishwasher. 3. Remove the 4 screws on the lower access panel and remove the lower access panel. 4. Place a shallow pan under the water supply valve. Then, use a wrench to disconnect the water inlet from the water supply valve. Separate the water inlet from the water supply valve and drain water into the pan. 5. Remove the spring clamp from the water outlet and separate from the water supply valve; drain water into pan. 6. Reconnect both water inlet and water outlet to the water supply valve. 7. Empty the pan and reposition it under the water pump. 8. Remove the clamp and disconnect the drain hose from the water pump; drain water into pan. 9. Reconnect drain hose to the water pump, being sure to position the clamp over the connection. 10. Replace the lower access panel.
Figure 1
Figure 2
20
|
|
|
> |
|