Thank you for providing this manual and at low cost.
The Philips scope is of excellent quality, longevity and build and had a couple of faults
when it was passed to me. Having the CCT diagrams is a blessing.
I have fixed the problems and also modded the scope to my requirements.
I have built a 24v Li-Ion pack for portable use from old but good laptop batts.
it is working beautifully and I am well pleased. Keep up the good work Guys.
Awesome quality manual. You really saved my bacon with this one. Was looking for some specific information with regards to my "new" vintage VCR that didn't come with the owners manual. This site is truely a goldmine of available manuals. The quality of the scans are top notch.
Thank-you so much for this awesome manual. If you're looking for this Sony SL-HF400 owners manual, this is the one you NEED to buy. Definitely worth the money.
The manual was made available promptly. I is a clean scan of the original. I had no problem downloading it. The scan was well centered and cleanly formatted. It is as good a product as can be had without being the original document.
Received downlink in less then 8 hours, Item was in good copy condition, and told me how to program the clock timer. The price was very resonable, and the process was very automated and was GREAT to work with.
Text excerpt from page 20 (click to view)
Storing
your
dishwasher
your
Moving or winterizing dishwasher
Protect your dishwasher and home against water damage due to freezing water lines. If your dishwasher is left in a seasonal dwelling or could be exposed to near freezing temperatures, have a qualified person do the following:
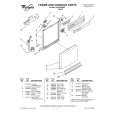
NOTE: Pump motor styles vary by model.
Refer to Figure 1 or Figure 2, depending on the style of your dishwasher. 1. Disconnect power supply to the dishwasher. 2. Turn off water supply to the dishwasher. 3. Remove the 4 screws on the lower access panel and remove the lower access panel. 4. Place a shallow pan under the water supply valve. Then, use a wrench to disconnect the water inlet from the water supply valve. Separate the water inlet from the water supply valve and drain water into the pan. 5. Remove the spring clamp from the water outlet and separate from the water supply valve; drain water into pan. 6. Reconnect both water inlet and water outlet to the water supply valve. 7. Empty the pan and reposition it under the water pump. 8. Remove the clamp and disconnect the drain hose from the water pump; drain water into pan. 9. Reconnect drain hose to the water pump, being sure to position the clamp over the connection. 10. Replace the lower access panel.
Figure 1