|
|
|
Who's Online
There currently are 5679 guests online. |
|
Categories
|
|
Information
|
|
Featured Product
|
|
|
 |
|
|
There are currently no product reviews.
 ;
Great price, Quick delivery, the document was very usefull A+++++++++++++++
;
Thank´s for your help, I already recived these manual from you
;
Thank you for your manual It has the basic things to and i use the Oszi for Longer Time.
THX
;
Actually, I was looking for this information for 3 years!...now thanks to you, the manual is on my hands and of great help, cause I understand now where I was doing wrong connections and wires...excellent, I'll be back to you if in need, thank you.
 ;
This manual covers the main equipment features only. While it also includes the procedure for saving and loading from the now long obsolete memory cards it does not mention the how to operate with the optional floppy drive interface so I am still at a loss about how to use this! Note that there is a separate manual covering the MIDI interface and programming via the keyboard, not included in this download. You will also need to get hold of this if you want to use the MIDI interface properly. Basically there is little difference between this manual and the free to download manual for the similar PR60 model.
Mixed
l
load
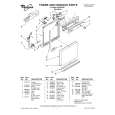
Do not cover third level wash
Load plastic items in the top rack only. Only plastic items marked �dishwasher safe� are recommended. Load plastic items so the force of the spray does not move them during the cycle. Plastic items can be melted in the bottom rack.
l
l
Utensil
load
Mixed load
. Small howls, pans and other utensils can be placed in the top rack.
Adjustable
.
3-position
I
top
rack
(on some models~
You can raise or lower the rack to fit tall items in either the top or bottom rack. The high and bw positions are marked on the adjuster on the side facing the center of the dishwasher. 1. Hold the top rack with one hand near the adjuster. 2. Pull the top of the adjuster lever out with the other hand. 3. Lift or lower the rack to one of the preset positions. 4. Release the adjuster lever. 5. Repeat Steps l-4 for the three remaining adjusters as needed. The four adjusters can he raised or lowered separately or together, as desired. The top rack does not have to be level.
16
|
|
|
> |
|