|
|
|
Who's Online
There currently are 5675 guests online. |
|
Categories
|
|
Information
|
|
Featured Product
|
|
|
 |
|
|
There are currently no product reviews.
 ;
Exactly as advertized. High quality digital copy of the Nak 610 user manual. Easy download and access. Highly recommended.
;
The manual was exactly what I wanted and I found it nowhere else. Thanks!
;
Having purchased a 1994 Kenwood music system from a Charity shop in 2013 (it was a high end product in its day), I found myself not quite knowing where to plug in what, and how to do this, that and the next thing. I needed a Manual, and after failure with another online 'Manual provider' I found Owner Manuals dot com. Well, I wasn't sure, but it was only $5, and if things didn't work out, I wouldn't have lost much...
But things DID work out. After paying my childrens inheritance money, $4.99, I was sent a Manual for my Kenwood System very quickly. Alas, it was in German, and being Scottish, I could not read it or get my system in order from it...a rapid email to them brought the English Manual in short order, and my retro-system was and IS up and running in it's regulation settings.
I am very grateful to http://www.owner-manuals.com for their quick service and for even having such an obsolete Manual in the first place! If you need a Manual for ANYTHING, try here first. I wouldn't be surprised if I bought a 1928 Marconi radio, and got the user Manual for THAT here too!
Top marks.
John Copeland
Glasgow
Scotland
;
I was so happy that the owner's manual was available. It is well written and helped me to use the radio/CD player/recorder without problems. Thanks for making it available.
Irene Lambert
;
Excellant!!! Very quick and easy....Best $4.99 I have spent in a very long time..
I highly recommend this.
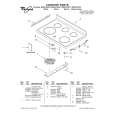
Surface
To Install
Burner
Burner
Module
Module
]
1. Be sure all control knobs are turned off. 2. If the grill burner before installing burner basin of Cook-top Cleaning grates are in place, remove them a surface burner module. Clean any grease accumulation (See Chart, pp. 10-11).
Grill Module
The grill consists of two black grill grates and a grill burner. Only install the grill on the left side of your eooktop.
3. Position the burner assembly with the mixer tube assembly toward the orifices until the opening for the ignitor is over the ignitor. Lower into place until the side openings are resting on the burner supports and the ignitor is centered between the two flash tubes. 4. openings aeration tray by inserting the prongburner Install the toward the orifiees. Slide the at the end of the tray into tile opening in the end of the burner basin. Lower the opposite end into the eooktop. NOTE: Before first use, read "Surface Cooking" and "Cleaning Chart--Surface Burner Assembly" pages 7 and 11. Burner Module _ _I _!_ l
To Install
Grill
Module be certain control
1. Before installing grill components, knobs are in the OFF position.
To Remove
'2. Position the grill burner with mixer tube openings toward the orifices. Slide the burner towards the orifices until the ignitor is in between front and rear grill sections. Lower into place until side openings are resting on fi_e burner support pins. 3. Place the grill grates on the top of the cooktop.
1. The control knobs should be in the OFF position and the eooktop should be cool 2. Remove the aeration tray by lifting up the front end on the right side (back end on tile left side) until the top clears the opening of the eooktop by about 5 inches. 3. Hold aeration tray by the sides and slide away to remove the prong from the opening and clear the surface burners. 4. Lift up on the sides of the surface burner assembly bracket about 2 inches. Slide away from the orifices.
To Remove
Grill
Module
1. Remove grill components once they are cool. Be sure control knobs are in the OFF position. 2. Remove grill grates. 3. Remove grill burner. =AGE 6
|
|
|
> |
|