|
|
|
Who's Online
There currently are 5964 guests online. |
|
Categories
|
|
Information
|
|
Featured Product
|
|
|
 |
|
|
There are currently no product reviews.
 ;
Very well done!!!!! congratulations. It was a bit longer than usual the wiating time even if it was on time (in 24 hours).
;
Last week I bought a second hand BAUKNECHT TRK4850 DRYER. It is a professional machine with many programs and switch options. I feared it would be a huge quest to find a manual. I was delighted when I found owner-manuals.com. After payment I received the file to download the next day already. The quality is great. I am very happy. Thanks!
but kindly the distributions of the operating programs not find in the owners manual,can you help me to understand the operating programs instructions thank you
;
Very good copy, very readable and easy transaction as always.
;
It is perfect, exactly what we needed. It's like the paper version but less clutter.
 ;
Received my manual within 24 hours. Very clear scan of the manual I needed. Thanks!
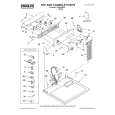
Checking Your Vent
Your dryer must be properly installed and vented to achieve maximum drying efficiency and shorten drying times. Use the minimum recommended installation clearances found in the Installation Instructions. See the Installation Instructions for more information. 1. Do not use plastic vent or metal foil vent. Use 4" (10.2 cm) metal or flexible metal vent. Do not kink or crush flexible metal vent. It must be completely extended to allow adequate exhaust air to flow. Check vent after installation. Refer to the Installation Instructions for proper length requirements of vent. 2. Use a 4" (10.2 cm) exhaust hood.
WARNING
4" 10.2 cm
3. Use the straightest path possible when routing the vent.
Fire Hazard Use a heavy metal vent. Do not use a plastic vent. Do not use a metal foil vent. Failure to follow these instructions can result in death or fire.
Good Better
If the dryer is not properly installed and vented, it will not be covered under the warranty. Proper venting of your dryer is important for satisfactory drying results. See the Installation Instructions for more detail. NOTE: Service calls caused by improper venting will be paid for by the customer, whether it was a paid installation or selfinstalled.
4. Use clamps to seal all joints. Do not use duct tape, screws or other fastening devices that extend into the interior of the vent to secure vent. 5. Clean exhaust vent periodically, depending on use, but at least every 2 years, or when installing your dryer in a new location. When cleaning is complete, be sure to follow the Installation Instructions supplied with your dryer for final product check.
DRYER USE
Starting Your Dryer
WARNING
WARNING
Explosion Hazard Keep flammable materials and vapors, such as gasoline, away from dryer. Do not dry anything that has ever had anything flammable on it (even after washing). Failure to follow these instructions can result in death, explosion, or fire.
Fire Hazard No washer can completely remove oil. Do not dry anything that has ever had any type of oil on it (including cooking oils). Items containing foam, rubber, or plastic must be dried on a clothesline or by using an Air Cycle. Failure to follow these instructions can result in death or fire.
This booklet covers several different models. Your dryer may not have all the cycles and features described. Before using your dryer, wipe the dryer drum with a damp cloth to remove dust from storing and shipping. 1. Clean lint screen before each load. See �Cleaning the Lint Screen.�
2. Load clothes loosely into the dryer and close the door. Do not pack the dryer. Allow space for clothes to tumble freely. 3. Turn the Cycle Control knob to the recommended cycle for the type of load being dried. Use the Energy Preferred Automatic Setting to dry most heavy to medium weight fabrics.
3
|
|
|
> |
|