|
|
|
Who's Online
There currently are 5934 guests online. |
|
Categories
|
|
Information
|
|
Featured Product
|
|
|
 |
|
|
There are currently no product reviews.
 ;
I'm so glad I was able to find a site to download my missing manuals. Very reasonable prices and they kept me informed about the process and I had my manual within less than a day. The only thing I wish was an option is a 100% English version with no spanish or anything. But overall great site.
;
The manual is complete with excellent quality! One suggestion, show number of pages and weather it is multi-lingual. The AD 600 Manuel is about 76 pages and over half is non English. This results in a larger print job than usually needed. Having this information, one could select the desired pages for printing.
 ;
I've been looking for a copy of the original user/owner manual. Just what the doctor ordered, thank you.
;
the manual was very helpful thank you very much no one else was able to help me thanx
;
This is an excellent handbook. We had no information on the appliance until we obtained this and are now able to use the appliance to its full potential. Strongly recommended.
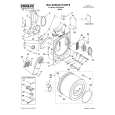
2. Insert cord brackets into slotted holes in rear panel and secure with screws provided.
Connect Vent
1. Using a 4" (10.2 cm) clamp, connect vent to exhaust outlet in dryer. If connecting to existing vent, make sure the vent is clean. The dryer vent must fit over the dryer exhaust outlet and inside the exhaust hood. Make sure the vent is secured to exhaust hood with a 4" (10.2 cm) clamp. 2. Move dryer into final position. Do not crush or kink vent. Make sure dryer is level. 3. (On gas models) Check to be sure there are no kinks in the flexible gas line.
A
Complete Installation
B C
A. Cord bracket B. Slotted hole C. Screw
1. Check to be sure all parts are now installed. If there is an extra part, go back through the steps to see which step was skipped. 2. Check to be sure you have all of your tools. 3. Dispose of/recycle all packaging materials. 4. Check the dryer�s final location. Be sure the vent is not crushed or kinked. 5. Check to be sure the dryer is on a level surface. 6. Plug into a grounded 3 prong outlet. Turn power on. 7. Remove the blue protective film on the console and any tape remaining on the dryer. Remove tape from the lint screen (located on inside back wall of dryer). 8. Read �Dryer Use.� 9. Wipe the dryer drum interior thoroughly with a damp cloth to remove any dust. 10. To test the dryer, set the dryer on a full heat cycle (not an air cycle) for 20 minutes and start the dryer. If the dryer will not start, check the following:
s s s
NOTE: Power supply cord may be wrapped around the brackets for storage convenience when dryer is not in use.
Install casters
1. Lay the dryer on its side. 2. Use the carton to prevent damage to the dryer.
Controls are set in a running or �On� position. Start button has been firmly pushed. Dryer is plugged into a grounded 3 prong outlet. Electrical supply is connected. House fuse is intact and tight, or circuit breaker has not tripped.
3. Screw casters into dryer base at four corners and tighten securely. 4. Set the dryer upright. In doing so, be careful that the dryer does not roll away from you. 5. NOTE: Permanent installations require 4 dryer feet. See �Assistance or Service� section for ordering information.
s s s
Dryer door is closed. 11. When the dryer has been running for 5 minutes, open the dryer door and feel for heat. If you do not feel heat, check the following:
s
Controls are set on a heated cycle, not an air cycle.
NOTE: You may notice a burning odor when dryer is first heated. This odor is common when the heating element is first used. The odor will go away.
9
|
|
|
> |
|