I am very happy with the owner's manual. I bought a used Casio and was so relieved that I was able to get a hold of a owner's manual. It was very easy to download the manual and I had no problems with printing it. Thank you! Nancy Whalen
Very satisfied with received document, all is right, Thank You very much, it was a Pleasure to work with You.
Text excerpt from page 7 (click to view)
Installing the Cabinet in a Window
s s
Handle air conditioner with care. Be sure your air conditioner cabinet does not fall out of the opening during installation or removal. The place where the power cord exits the air conditioner should be no more than 4 ft (122 cm) from a grounded outlet. Do not block the louvers on the front panel. Do not block the louvers on the outside of the air conditioner.
8. Pull cabinet part way out of window. Attach right filler board to front of a side-mounting angle with two ¹�� in. hex-head screws.
s
s s
2 1
Filler board installation
1. Center empty cabinet in window. Maintain a firm hold on the air conditioner cabinet. Lower window sash to hold cabinet in place. 2. Measure the distance between the right side of the cabinet and the inside of the window channel. 3. Repeat for the left side. 4. Adjust the cabinet until the distance on each side is the same. Then add ¹�� in. (3.2 mm) for the final measurement to be used in the next step.
3
1. Right filler board 2. Side-mounting angle 3. ¹�� in. hex-head screw
Top View
9. Place cabinet back into the window with right filler board tight against window channel. Insert left filler board into window channel.
5. Use final measurement to measure in from each edge of the filler board. Mark lines in such a way that the outside edges of the filler board will contain the screw holes. 6. Place cardboard or other protective material on a sturdy, flat surface. Position filler board on top of the protective material to keep from cutting into the surface below. 7. Place a ruler or straight edge along the lines drawn previously and use a utility knife to cut filler boards to size along the lines. Make cut so the outside edges of filler boards will have screw holes.
10. Push left filler board against side-mounting angle and attach with two ¹�� in. hex-head screws. From the outside, push filler boards as far forward in window channels as possible.
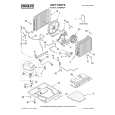
Foam block installation
1. Measure the distance between the channel edge and the filler board. 2. Cut foam blocks ¹�� in. (6.4 mm) wider and insert into channel behind filler boards. Top View