|
|
|
Who's Online
There currently are 6043 guests online. |
|
Categories
|
|
Information
|
|
Featured Product
|
|
|
 |
|
|
There are currently no product reviews.
 ;
Being a user of older radios of many kinds, preferring them over more modern rigs, this manual was invaluable in the programming of my two. I now know for certain what the assorted buttons functions are, and am very grateful to have found this excellent site. Many thanks for your assistance, Tony.
 ;
Clear and easy to read. All details as expected. Price acceptable , and quick delivery.
;
Quick response and exactly what I was looking for and at a great fair price!
;
5 star quality on these downloadable manuals. Easy to read and all the information is there. A must when doing a custom install or needing to service your precious old school electronics.
;
So usefull to make my installation a breeze. 5 stars on quality.
HEAT EXCHANGER
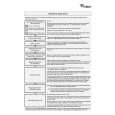
Before cleaning or carrying out maintenance, switch off the dryer. Clean the heat exchanger at least every three months, proceeding as follows: A. Open the door and press the heat exchanger flap button on the bottom of the door entrance. B. The heat exchanger flap opens. C. Fold the heat exchanger handle upwards to the horizontal position and remove the heat exchanger. D. Clean the heat exchanger under running water by turning it around to reach all sides. E. Wipe away dust and lint from the seals and the heat exchanger. F. Remove the lint in the heat exchanger housing. Keep the drainage hole (left side in front in the housing) free from lint. G. Replace the heat exchanger in its housing (TOP or HAUT mark upwards) and press the handle. H. Close the flap. The heat exchanger aluminium plates may become discoloured over time.
A
B
C
D
42
|
|
|
> |
|