|
|
|
Who's Online
There currently are 6043 guests online. |
|
Categories
|
|
Information
|
|
Featured Product
|
|
|
 |
|
|
There are currently no product reviews.
 ;
The PDF copy was immediately available on download after the payment. However, I noticed that the document was in German, and Ihad to contact a German translator to get it translated it to English. The quality of document is legible can be used for my purpose.
 ;
The manual was complete and of great quality. Originally a tri-lingual file, I first received only one language. After a note to owners-manuals.com, I quickly received the remaining languages... Great service, definitely worth it.
;
Thank you for providing this manual and at low cost.
The Philips scope is of excellent quality, longevity and build and had a couple of faults
when it was passed to me. Having the CCT diagrams is a blessing.
I have fixed the problems and also modded the scope to my requirements.
I have built a 24v Li-Ion pack for portable use from old but good laptop batts.
it is working beautifully and I am well pleased. Keep up the good work Guys.
;
manual was very helpful in learning how to propery use my washer. I could not find this manual anywhere else.
;
Awesome quality manual. You really saved my bacon with this one. Was looking for some specific information with regards to my "new" vintage VCR that didn't come with the owners manual. This site is truely a goldmine of available manuals. The quality of the scans are top notch.
Thank-you so much for this awesome manual. If you're looking for this Sony SL-HF400 owners manual, this is the one you NEED to buy. Definitely worth the money.
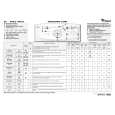
Carga de la ropa
1. Abra la tapa tirando de ella ligeramente hacia arriba. 2. Abra el tambor presionando el pulsador (imágenes �1a� o �1b�) - según el modelo. 3. Coloque las prendas en el tambor una por una. No deberá exceder la carga máxima de los programas indicada en la tabla de programas. Notas: - La sobrecarga reduce la eficacia del lavado y favorece la formación de arrugas en la ropa. - Compruebe que la ropa no sobresalga del tambor; Si esto sucede, empuje la ropa hacia el fondo del tambor dejando espacio suficiente para cerrar las aletas correctamente. - No use las aletas para empujar la ropa hacia el fondo del tambor. 4. Para cerrar el tambor, vuelva a sujetar ambas puertas en el centro (imagen 2). ATENCI�N: asegúrese de que las aletas del tambor estén bien bloqueadas - según el modelo: - el gancho metálico deberá estar completamente enganchado en la aleta de la puerta trasera - véase la imagen 2a, o - todos los ganchos metálicos deberán estar bien enganchados dentro de la aleta de la puerta trasera, y el botón deberá estar montado sobre el borde de la aleta de la puerta trasera - véase la imagen 2b. - Compruebe que no quede ropa atrapada entre las aletas, o entre las aletas y el tambor.
1a
1b
2
2a
E6
|
|
|
> |
|