|
|
|
Who's Online
There currently are 5774 guests online. |
|
Categories
|
|
Information
|
|
Featured Product
|
|
|
 |
|
|
There are currently no product reviews.
 ;
Excellant!!! Very quick and easy....Best $4.99 I have spent in a very long time..
I highly recommend this.
;
Thanks so much for the Owner's manual for my Sony PS - FL1. I had purchased the turntable off of eBay. It came in and looked great. Packed well and appeared to be great. I balanced and aligned the tone are and hooked it up. When trying to play a record the tone are would move to the right place and just before it would drop to play it moved back off the edge of the record before touching down. I searched the net for an answer to this issue. No luck. Then I purchased the owners manual and sure enough there was a place to adjust where the stylus touched down. That adjustment solved the problem and saved me a $35 feet to have the player checked out. The manual is well written and easy to understand. It is a must have for anyone with this front loading Sony turntable.
;
Some years back I pruchased a Sansui G-9000. I had it cleaned up and a problem with the left channel repaired. When I got it back I hooked it up to my tape decks, turn tables, TV and it played great. The only thing I was not really satisfied with was the performance of my Graphic Equalizer. I purchased this owner's manual had poured myself a cup of coffee. The manual is well organized and written in plain language. It also contained the solution to my dissatisfaction. By using the preamp connections coupled I was able to run everything through my graphic equalizer and now enjoy the full potential of my complete system.
 ;
An excellent service for the price, however, it would also have been handy if the troubleshooter pages were included. The manual is only sent in the language of your country, thus it looks as though there are some pages missing. Otherwise highly recommended.
;
I am happy to get a rare TECHNICS SH-9090 Owner's Manual by PDF in clear copy.
3fr33000.fm5 Page 29 Tuesday, March 6, 2001 11:50 AM
COMMENT FAIRE FONCTIONNER LE COMPARTIMENT CONG�LATEUR
Production de glaçons
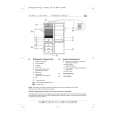
� Remplissez le bac à glaçons aux 3/4 d'eau et posez-le sur le fond du compartiment congélateur. Pour accélérer la formation des glaçons, placez le bac sur le fond du premier casier (comme le montre la figure) et non pas sur le plateau porte-eutectiques (s'il est fourni). � Si le bac est collé au fond du compartiment, n'utilisez pas d'objets pointus ou tranchants pour le décoller.
COMMENT D�GIVRER LE COMPARTIMENT CONG�LATEUR
Nous vous suggérons de dégivrer le compartiment congélateur 1 ou 2 fois par an ou lorsque la formation de glace sur les clayettes a atteint 3 mm d'épaisseur. Il est conseillé de dégivrer quand les réserves sont peu abondantes. � 24 heures avant de procéder au dégivrage, appuyez sur la touche de congélation rapide (6), le voyant vert (7) devient jaune. Les aliments sont refroidis au maximum. � Ouvrez la porte et retirez tous les aliments. Enveloppez-les, bien serrés les uns contre les autres, dans du papier journal et placez-les dans un endroit très frais ou dans un sac isotherme. � Débranchez l'appareil. � Retirez les bacs à glaçons. � Retirez les paniers. � Dégagez la goulotte d'évacuation de l'eau de dégivrage du bas du compartiment congélateur. � Laissez la porte du congélateur ouverte. Placez le panier inférieur, qui présente un trou à l'arrière, sous la goulotte pour recueillir l'eau de dégivrage. Remarque : Pour éviter tout dommage irréparable, n'utilisez pas d'objet métallique pointu ou tranchant pour racler la glace et ne chauffez pas artificiellement l'intérieur du congélateur. Les dommages résultant de l'utilisation de tels objets ne sont pas couverts par la garantie. � Nettoyez le congélateur à l'aide d'une éponge imbibée d'une solution d'eau tiède et de détergent neutre. N'utilisez pas de substance abrasive. � Rincez et séchez soigneusement. � Rebranchez l'appareil. � Replacez le tuyau d'évacuation dans son siège et réinstaller les paniers. � Avant de remplacer les aliments dans le compartiment congélateur, appuyez de nouveau sur la touche de congélation rapide (6). Le voyant vert (7) devient jaune. Remarque : L'augmentation de la température des aliments congelés au cours du dégivrage risque de réduire leur période de conservation. 29
|
|
|
> |
|