|
|
|
Who's Online
There currently are 5889 guests online. |
|
Categories
|
|
Information
|
|
Featured Product
|
|
|
 |
|
|
There are currently no product reviews.
 ;
The manual was made available promptly. I is a clean scan of the original. I had no problem downloading it. The scan was well centered and cleanly formatted. It is as good a product as can be had without being the original document.
 ;
Received downlink in less then 8 hours, Item was in good copy condition, and told me how to program the clock timer. The price was very resonable, and the process was very automated and was GREAT to work with.
;
Fast service, document is OK. Thanks! Searched for it long time.
;
I was very pleased with the manual I got for my amateur (ham) radio. Without it I could not figure out how to input and/or change the P/L setting on my radio. It drove me nuts as the radio was essentially useless. That all changed when my manual came. Then it took only minutes and I was done. Now my radio works fine. This is an exceptionally good resource as it's a very easy and user friendly download. Thank you very much! Dziękujemy za!
;
It answered my question, which was how to load the paper. I did notice that the very end of the manual was not visible.
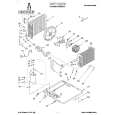
Changing
TAB
air direction
The louvers in the arille area at the too of the air conditioner control the direction of the cooled arr.
The tabs at the bottom of the grille can be moved to the right, left or straight ahead. Move the tabs in the direction in which you want the air to flow.
Air flow can also be directed up or down. Move the tab in the center louver in the desired air flow direction.
Caring for your air conditioner
Proper use and care of your air conditioner will help insure longer life and lower operating costs. Follow these instructions carefully or call your dealer for an annual checkup.
Cleaning
of front panel and filter
A clean filter helps remove dust, lint and other particles from the air. Check every two weeks to see if the filter needs cleaning. The front panel may also be cleaned at this time.
1. Remove front panel from unit for cleaning. Press down at top edge of front panel to release it from top of cabinet. 2. Pull top of front panel toward you. 3. Lift up and away from bottom spring clips. 4. Remove filter from front panel by removing elastic band which holds it in place. 5. Clean filter by using a vacuum cleaner or, if very dirty, wash filter with warm water and a mild detergent. Air dry thoroughly before replacing. DO NOT USE A HOT AIR DRYER. 6. Clean front panel using a soft cloth with warm water and a mild detergent. Rinse and dry. (See CAUTION at right.) 7. Replace filter and hold it with elastic band 6. Wipe control panel clean with a soft dry cloth. 9. Replace front panel. Locate bottom of panel on the spring clips. Press down on top edge of front panel and push front toward unit to secure upper tabs.
CAUTION: Do not use cleaning fluid, solvents, abrasive cleaners, or strong detergents. They may damaae Darts.
|
|
|
> |
|