|
|
|
Who's Online
There currently are 6039 guests and
4 members online. |
|
Categories
|
|
Information
|
|
Featured Product
|
|
|
 |
|
|
There are currently no product reviews.
 ;
This is a very well written and comprehensive manual. It answered all our queries.
;
Excellent copy that was delivered within 12 hours and solved my problem.
 ;
I did not have the manual for a Whirl Pool gas dryer, therefore I purchased it from Owner-manuals. This is exactly what I needed. Thank you for the service.
;
I was so pleased to get the owner`s manuel within one hour! Thanks again.
Regards
Werner
;
Finding the owners manual for my Pioneer CRWM62R is greatly appreciated. I had searched several other web sites with no success. Although my manual was not listed on your site for immediate download, I recevied an email within a few hours that my ower's manual was posted for me. I had no difficulty downloading the manual for my 20 year old multi-cassette player. Owner Manuals provides a service that is valuable, easy-to-use, accurate , efficient, and priced fairly. I thank you.
3gb54361.fm5 Page 19 Thursday, May 9, 2002 6:01 PM
INSTALLATION
Cooktop
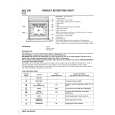
� The cooktop must be set into a worktop between 20 mm and 50 mm thick. There must be nothing between the cooktop and the oven (cross rails, brackets, etc.). � Cut an opening in the worktop of the dimensions shown in the product description sheet supplied separately. � If not already present, fit the supplied seal to the cooktop flange after cleaning the contact area as shown in the figure. � If the worktop is made of wood, fit the supplied spring clips. 1. Position the 4 spring clips (B) and fit them in their locations on the underside of the cooktop. 2. Fit the cooktop into the worktop. � If the worktop is made of marble, plastic, ceramics, natural stone, etc., the cooktop must be secured with brackets (C) to be requested from After Sales Service under part number 4819 310 18528. 1. Position the brackets over the holes and secure them with the supplied screws. 2. Fit the cooktop into the worktop.
Conventional electric cooktop
Glass-ceramic cooktop
N.B.: remove the protective film before installing the cooktop. � If the worktop is made of wood, fit the supplied spring clips. 1. Position the 4 spring clips (D) as shown and at the specified dimensions. 2. Secure the spring clips using screws (E). 3. Fit the cooktop into the worktop. � If the worktop is made of marble, plastic, ceramics, natural stone, etc., the cooktop must be secured with brackets (F) code 4819 404 78697 (to be requested from After Sales Service). 1. Fit the cooktop into the worktop. 2. Position the 4 brackets (F) as shown in the figure, in accordance with the thickness of the worktop. 3. Fix the 4 screws (G) in holes (H).
Top 30÷50 mm.
Top 30÷50 mm.
19
|
|
|
> |
|