|
|
|
Who's Online
There currently are 6041 guests and
2 members online. |
|
Categories
|
|
Information
|
|
Featured Product
|
|
|
 |
|
|
There are currently no product reviews.
 ;
Thanks for offering this item at such a good price. Proved handy in identifying the part I was looking for my set.
;
Thr Video Recorder i have is quiet Old and the Producer could Not help me. So i w as very glad to find an offer for the owners Manual for a very fair Price.a I obtained the original Manual very quick and I am happy to have it now.
 ;
The PDF copy was immediately available on download after the payment. However, I noticed that the document was in German, and Ihad to contact a German translator to get it translated it to English. The quality of document is legible can be used for my purpose.
;
The manual was complete and of great quality. Originally a tri-lingual file, I first received only one language. After a note to owners-manuals.com, I quickly received the remaining languages... Great service, definitely worth it.
;
Thank you for providing this manual and at low cost.
The Philips scope is of excellent quality, longevity and build and had a couple of faults
when it was passed to me. Having the CCT diagrams is a blessing.
I have fixed the problems and also modded the scope to my requirements.
I have built a 24v Li-Ion pack for portable use from old but good laptop batts.
it is working beautifully and I am well pleased. Keep up the good work Guys.
Connecting the oven to the power supply
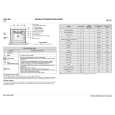
_ Make sure that the voltage indicated on the rating plate is the same as the mains voltage. The rating plate is on the front edge of the oven (visible when the door is open). _ If the power cable is not present proceed as follows: 1. Remove the two fastening screws of the terminal box cover located on the bottom part of the oven's rear covering. 2. Remove the cover to gain access to the terminal box and insert the power cable (see table) through the opening located on the bottom of the oven.
Power supply cable table N° of conductors 1N+ Type of cable H05 RR-F 3 X 1.5 mm²
~
3. Connect the cable to the terminal box, tighten the screws as far as they will go and secure it to the cable fastener. 4. Put the cover back on by inserting the two blades in the slots and fasten it with the two screws.
Securing the oven
_ Lift up the oven getting hold of it by the handles (B) on the sides and insert it into the housing unit, being careful not to trap the power supply cable (fig. 8). _ Center the oven in the housing unit before securing it. _ The oven comes with spacers already fitted to facilitate the anchoring of the oven to the housing unit with the screws provided (as shown in fig. 9).
7
8
9
7
|
|
|
> |
|