|
|
|
Who's Online
There currently are 5599 guests online. |
|
Categories
|
|
Information
|
|
Featured Product
|
|
|
 |
|
|
There are currently no product reviews.
 ;
Perfect. Very good service and very good scanning quality. All sheets are very legible. Thank's
;
My first manual from Owner-Manuals.com but not the last! I am very satisfied with the easy ordering and promt delivery of a manual I did not find anywhere else.
 ;
This manual is very helpfull to use the Power Supply. All technical information has been available.
For service use the circuit diagrams are very good.
Thanks .
;
Very comprehensive document which is a must-have for any Satellit 2100 owner whose set up is somewhat intricate. Due to the bad quality of the pictures that are rather dark and a bit blurred I gave 4-star feedback.
;
The manual was missing 2 pages but when I presented the problem to the company they made every attempt to get the 2 pages to me, when they couldn't they refunded my money. A very pleasing and easy transaction. The manual they provided was the original, it was concise and to the point. I plan to do business with this company again when should the need arise.
3GB94501.fm5 Page 73 Monday, July 9, 2001 5:01 PM
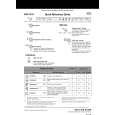
CARE AND MAINTENANCE
Before cleaning or carrying out maintenance, switch off the appliance, disconnect the mains plug and turn off the water tap. Cleaning the outside of the appliance: To clean the outside of the appliance, use a neutral detergent and a damp cloth. Clean the control panel with a damp cloth only. Do not use abrasive detergents. Cleaning the inside of the dishwasher: Regularly wipe the door seal and inside of the door with a damp cloth to remove any food residue. Upper spray arm: 1. Slacken the fixing nut (by turning it counter-clockwise) and detach the spray arm by pulling it down. 2. Rinse the nozzles. 3. Remount the spray arm by aligning it with the rotary mounting. 4. Tighten the fixing nut by turning it clockwise. The fixing nut must be tightened until it clicks! Make sure the spray arm rotates freely.
Lower spray arm: 1. 2. 3. 4. Remove the spray arm by lifting it upwards. Rinse the nozzles. Remount the spray arm by aligning it with the rotor pin and insert it. Push the spray arm down firmly until it is fixed in place. Make sure the spray arm rotates freely.
73
|
|
|
> |
|