|
|
|
Who's Online
There currently are 5983 guests online. |
|
Categories
|
|
Information
|
|
Featured Product
|
|
|
 |
|
|
There are currently no product reviews.
 ;
Thanks so much for the Owner's manual for my Sony PS - FL1. I had purchased the turntable off of eBay. It came in and looked great. Packed well and appeared to be great. I balanced and aligned the tone are and hooked it up. When trying to play a record the tone are would move to the right place and just before it would drop to play it moved back off the edge of the record before touching down. I searched the net for an answer to this issue. No luck. Then I purchased the owners manual and sure enough there was a place to adjust where the stylus touched down. That adjustment solved the problem and saved me a $35 feet to have the player checked out. The manual is well written and easy to understand. It is a must have for anyone with this front loading Sony turntable.
;
Some years back I pruchased a Sansui G-9000. I had it cleaned up and a problem with the left channel repaired. When I got it back I hooked it up to my tape decks, turn tables, TV and it played great. The only thing I was not really satisfied with was the performance of my Graphic Equalizer. I purchased this owner's manual had poured myself a cup of coffee. The manual is well organized and written in plain language. It also contained the solution to my dissatisfaction. By using the preamp connections coupled I was able to run everything through my graphic equalizer and now enjoy the full potential of my complete system.
 ;
An excellent service for the price, however, it would also have been handy if the troubleshooter pages were included. The manual is only sent in the language of your country, thus it looks as though there are some pages missing. Otherwise highly recommended.
;
I am happy to get a rare TECHNICS SH-9090 Owner's Manual by PDF in clear copy.
;
Hr, klasse , good manual, verry fast on my e-mail, very usefull manual. rgds; ahm zeegers
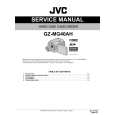
1. To remove outer cabinet:
a. Disconnect power cord. b. Take off the front plastic grille. Remove the two screws at the bottom. Drop grille down and take out.
TOP FLANGE
SOCKET HEAD SCREWS / (slde of cabinet) II I
c. Remove the cabinet screws on each side and top flange screws (see illustration). On 30, 40 and 48 pt. models, also remove rear grille. Pull out at bottom and drop grille down. d. Lift cabinet from unit,
6
2. Coils should be inspected annually Brush clean, if necessary, with warm water and mild detergent. Rinse and dry. Be sure power supply
.
c
r
c /:
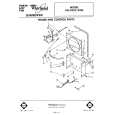
5. The compressor is sealed and needs no oiling. However, the fan motor should be checked anm mllv nnrl nilcrd
OIL FAN MOTOR #m--m- AI. ..-.(maCK VII Hole
Not Shown)
4. To oil fan motor, place a few drops of a good grade oil in both oil holes located on the fan motor. Oil capsules can be ordered [Part No. 10943) from your dealer.
5. Wash plastic parts with a soft cloth, warm water and mild detergent. Rinse and dry with a soft cloth. 6. Replace cabinet grille(s). Reconnect power supply cord.
8
|
|
|
> |
|