|
|
|
Who's Online
There currently are 5868 guests online. |
|
Categories
|
|
Information
|
|
Featured Product
|
|
|
 |
|
|
There are currently no product reviews.
 ;
Very good copy of Manual, clear and easy to print off, arrived very promptly and reasonably priced. Thanks, I will use you again
 ;
The service manual when downloaded and printed out was clear and easy to read. The manual is complete with the schematic diagram and technical data. I occasionally require a manual and now having registered with this company I shall order from them in the future.
;
Great manual, great price. I am very pleased with Owner-Manuals.com, quick service, fast communication. Will definitely use this site again.
;
Hello from Germany - thank you very much for the manual for my Sharp "Searcher" - the handling of your internet area is outstanding..Mike
;
I am very happy with the owner's manual. I bought a used Casio and was so relieved that I was able to get a hold of a owner's manual. It was very easy to download the manual and I had no problems with printing it. Thank you! Nancy Whalen
~�
-i
.
i
them loose enough so there is about l/16� of play. Tighten the bottom screws (Item 2). This will pull the unit mounting flange tightly to the window frame, sealing and locking the air conditioner in place.
Remove selected.
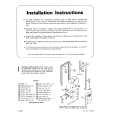
the glass from the frame opening Clear away any hardened putty.
WIN[IOW
FRAA(IE
Before sliding unit through the casement opening, remove the bottom window bracket (Item 3) on both sides of the unit. NOTE: only the top screws (Item 1) need to be removed. Check the knurled knob screws to see that the top mounting brackets (Item 5) are retracted to the center of the unit. They must not interfere with the window frame when the unit is installed (see Figure 23).
8.
Loosen the two knurled knob screws and slide the top mounting bracket (Item 5) toward the outside of the unit, engaging the window frame (see Figure 26). Tighten the knurled knob screw in this position. This will lock the unit in place so it cannot tilt into the room. The installation is now complete.
WE% s)taWlM
OUTSIt% OF WBJOOW
6
l
Lift the unit into the window opening and slide it back until the mounting frame comes into contact with the window frame (see Figure 24).
9
l
OPTIONAL MOUNTING If the window thickness use the four mounting the unit, remove
INSTRUCTIONS will not allow you to brackets provided with and fasten flanges
brackets
of unit with sheet metal screws (see Figure 27). These screws are not provided. The window opening for your installation must not be wider than 15�.
|
|
|
> |
|