|
|
|
Who's Online
There currently are 5649 guests online. |
|
Categories
|
|
Information
|
|
Featured Product
|
|
|
 |
|
|
There are currently no product reviews.
 ;
Great price, Quick delivery, the document was very usefull A+++++++++++++++
;
Thank´s for your help, I already recived these manual from you
;
Thank you for your manual It has the basic things to and i use the Oszi for Longer Time.
THX
;
Actually, I was looking for this information for 3 years!...now thanks to you, the manual is on my hands and of great help, cause I understand now where I was doing wrong connections and wires...excellent, I'll be back to you if in need, thank you.
 ;
This manual covers the main equipment features only. While it also includes the procedure for saving and loading from the now long obsolete memory cards it does not mention the how to operate with the optional floppy drive interface so I am still at a loss about how to use this! Note that there is a separate manual covering the MIDI interface and programming via the keyboard, not included in this download. You will also need to get hold of this if you want to use the MIDI interface properly. Basically there is little difference between this manual and the free to download manual for the similar PR60 model.
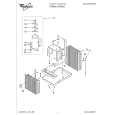
10. Slide the air conditioner onto the support platform. Be sure the unit side channel butts against the vertical edge of the window frame. Watch out for the sharp metal fins on the front and rear coils. NOTE: If unit side channel does not fit securely, remove air conditioner and readjust leveling bolt.
11. Using the existing clearance holes in the
Excessive Weight Hazard Use 2 or more people to move and install air conditioner. Failure to do so can result in back or other injury.
12.
13.
14.
15.
16. 17.
18.
air conditioner�s bottom bar as guides, drill two �/a� holes through the window channel frame. Install two self-threading screws through the clearance holes and into these holes. Tighten the screws securely. The air conditioner should be firmly anchored to the window channel frame. Be sure your air conditioner does not fall out during installation. Slide the inside window sash closed. Make sure the vertical edge of the inside window sash is pressed firmly against the side of the unit cabinet. Cut remaining adhesive back foam seal equal to the width of the window opening. Remove the backing and apply to the top inside edge of the window frame. Install the speed clips on the top and bottom inside edges of the window to provide locking. Insert the appropriate plastic foam seal between the inside window sash and the outside window. Place the top retainer on the top edge of the filler panel. Then place the bottom edge of the filler panel into the groove of the bottom retainer which is mounted on the air conditioner. The filler panel may be trimmed with a knife or scissors to fit the window height. Slide the sliders upward making sure the filler panel aligns in the sliders. With the sliders up against the top retainer, drill �/en hole through the window frame using the existing clearance hole in the slider as a guide. Install the selfthreading screw in the hole and tighten securely. Repeat for the other slider. Check all seals and plug all air leaks around the air conditioner with a suitable weather-proof sealing compound.
SUpport platform
Window channel
frame
Channel
Foam seal
|
|
|
> |
|