I found my Clarion VRX8370R in the Camper I bought and I wasn't able for month to understand it.
The Owner Manual was perfect and just what I was searching for.
Thank you.
Leonardo
I AM HIGHLY IMPRESSED BY THE EASE OF USE OF THIS DOWNLOAD SERVICE. INSTRUCTIONS ARE CLEAR AND SIMPLE TO FOLLOW....EVEN BY TECHNOPHOBES SUCH AS MYSELF. THE EMAILS POINT YOU IN THE RIGHT DIRECTION...ITS SO EASY PEASY. THE DOWNLOAD CHOICE OF USER MANUALS IS EXTENSIVE AND I COULD NOT FIND A CHEAPER OR MORE EFFICIENT SERVICE ON THE INTERNET. I COULD NOT HAVE MADE A BETTER CHOICE OF INFORMATION PROVIDER. SHOULD I EVER NEED ANOTHER USER MANUAL, THEN THIS IS THE FIRST CHOICE SITE. COULD NOT BE BETTER PLEASED!!!!!!!...MANY THANXES FROM JIM BURNS
Text excerpt from page 8 (click to view)
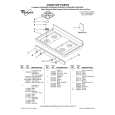
Level cabinet
1. Use a level to check that cabinet is level side to side. 2. Use a ³���" drill bit to drill 2 starter holes through the 2 holes in the cabinet and into the windowsill. 3. Attach cabinet to window with 2 - #10 - 12 x ³��" wood screws.
A
A C
B C
B
C B A B
A. Level B. Wood screw C. Windowsill A. Bolts B. Angle supports C. Vertical supports
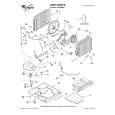
6. Measure inside width of window frame. 7. Cut foam window sash seal with square ends to fit. 8. Hold cabinet to prevent it from falling. Raise window sash. Align foam seal with front edge of window sash and attach seal with adhesive side against underside of sash. Lower window sash. Front View Side View
4. Check that air conditioner cabinet is tilted to the outside so that water will run to the outside.
Secure cabinet to window
1. Attach vertical support to angle support. Do not overtighten nut. Repeat.
A BC
B
E D D
A F B C D
A. Bolt B. Flat washer C. Lock washer D. Nut E. Vertical support F. Angle support
A. Width of frame B. Sash
C. Foam window sash seal D. Cabinet
9. Insert window rail seal behind the top of the lower window sash and against the glass of the upper window. 10. Place window-lock bracket on top of lower window and against upper window sash. 11. Use a ³���" drill bit to drill a starter hole through the hole in the bracket into the window sash. 12. Attach window-lock bracket to window sash with #10 - 12 x ³��" wood screw to secure window in place.
2. Attach support assembly to bottom of cabinet. Attach vertical supports to cabinet first. Do not tighten nuts at this time. 3. Attach angle supports to cabinet. Do not tighten nuts at this time. Slide each support assembly toward house until they are firmly against wall. NOTE: If your house is constructed of material that could be damaged by angle supports, fasten a board between angle supports and house. 4. Check that cabinet still tilts to the outside so that water will run to the outside. 5. Tighten nuts securely (do not overtighten) with a ����" socket and socket wrench. Tighten angle support nuts last so angle supports fit tightly against house.
A
B C
A. Window lock bracket B. Window rail seal C. Upper window glass